

Ableton Live: The Ultimate Overview for Producers
Ableton Live is one of the most popular DAWs for producing music.
It’s a favorite among producers of hip-hop and electronic music for its unique approach to loop-based composition.
If you’re just getting started with beat making or songwriting, Ableton Live is one of the best DAWs to learn.
But Live is a powerful tool. Understanding all its functions takes time and it can be confusing if you don’t have the right resources.
Even so, Live is one of the most intuitive pieces of music software ever developed. With a little guidance, you can easily become a pro Live user and create professional-quality tracks.
Here’s the ultimate guide to getting started with Ableton Live.
What is Ableton Live?
Here's a quick and fun tutorial outlining everything you need to know to get the most out of Ableton Live Lite.
Live is a digital audio workstation created by Ableton founders Gerhard Behles and Robert Henke.
Now in its 12th edition, Live began as a custom patch inside the modular environment called MaxMSP. Behles and Henke originally used it to perform as Monolake and developed a commercial app based on the idea that launched in 2001.
Since then, Ableton has become one of the leading music production brands for electronic music creation.
Live is now a mature DAW with powerful features to create any kind of music, but it’s particularly well-suited to certain workflows.
Ableton Live is probably right for you if:
- You work mainly with virtual instruments and samples
- You build arrangements using loops or looped segments
- You want to use your DAW for live performance
Why is Ableton Live so popular?
Live made big waves on the pro audio software scene when it was introduced, but why did it become so popular so fast?
The basic reason is that it’s built around the needs of electronic and hip-hop producers.
Here are some of the features that explain what I mean:
- The Session view lets you create and rearrange loops on the fly
- The “Warp” function allows for easy time stretching
- The built-in instruments and effects are top quality
- Tracks have an optional crossfader view that lets you cue them like a DJ mixer
With these capabilities in mind, it’s easy to see why electronic producers have gravitated towards Live.
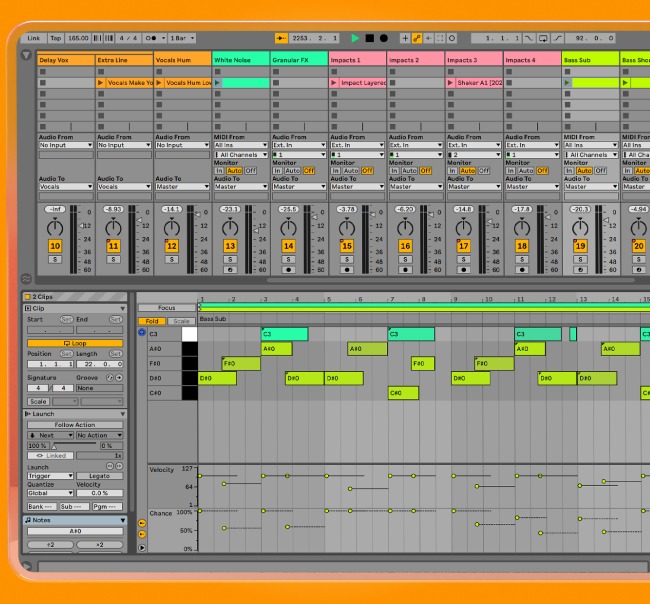
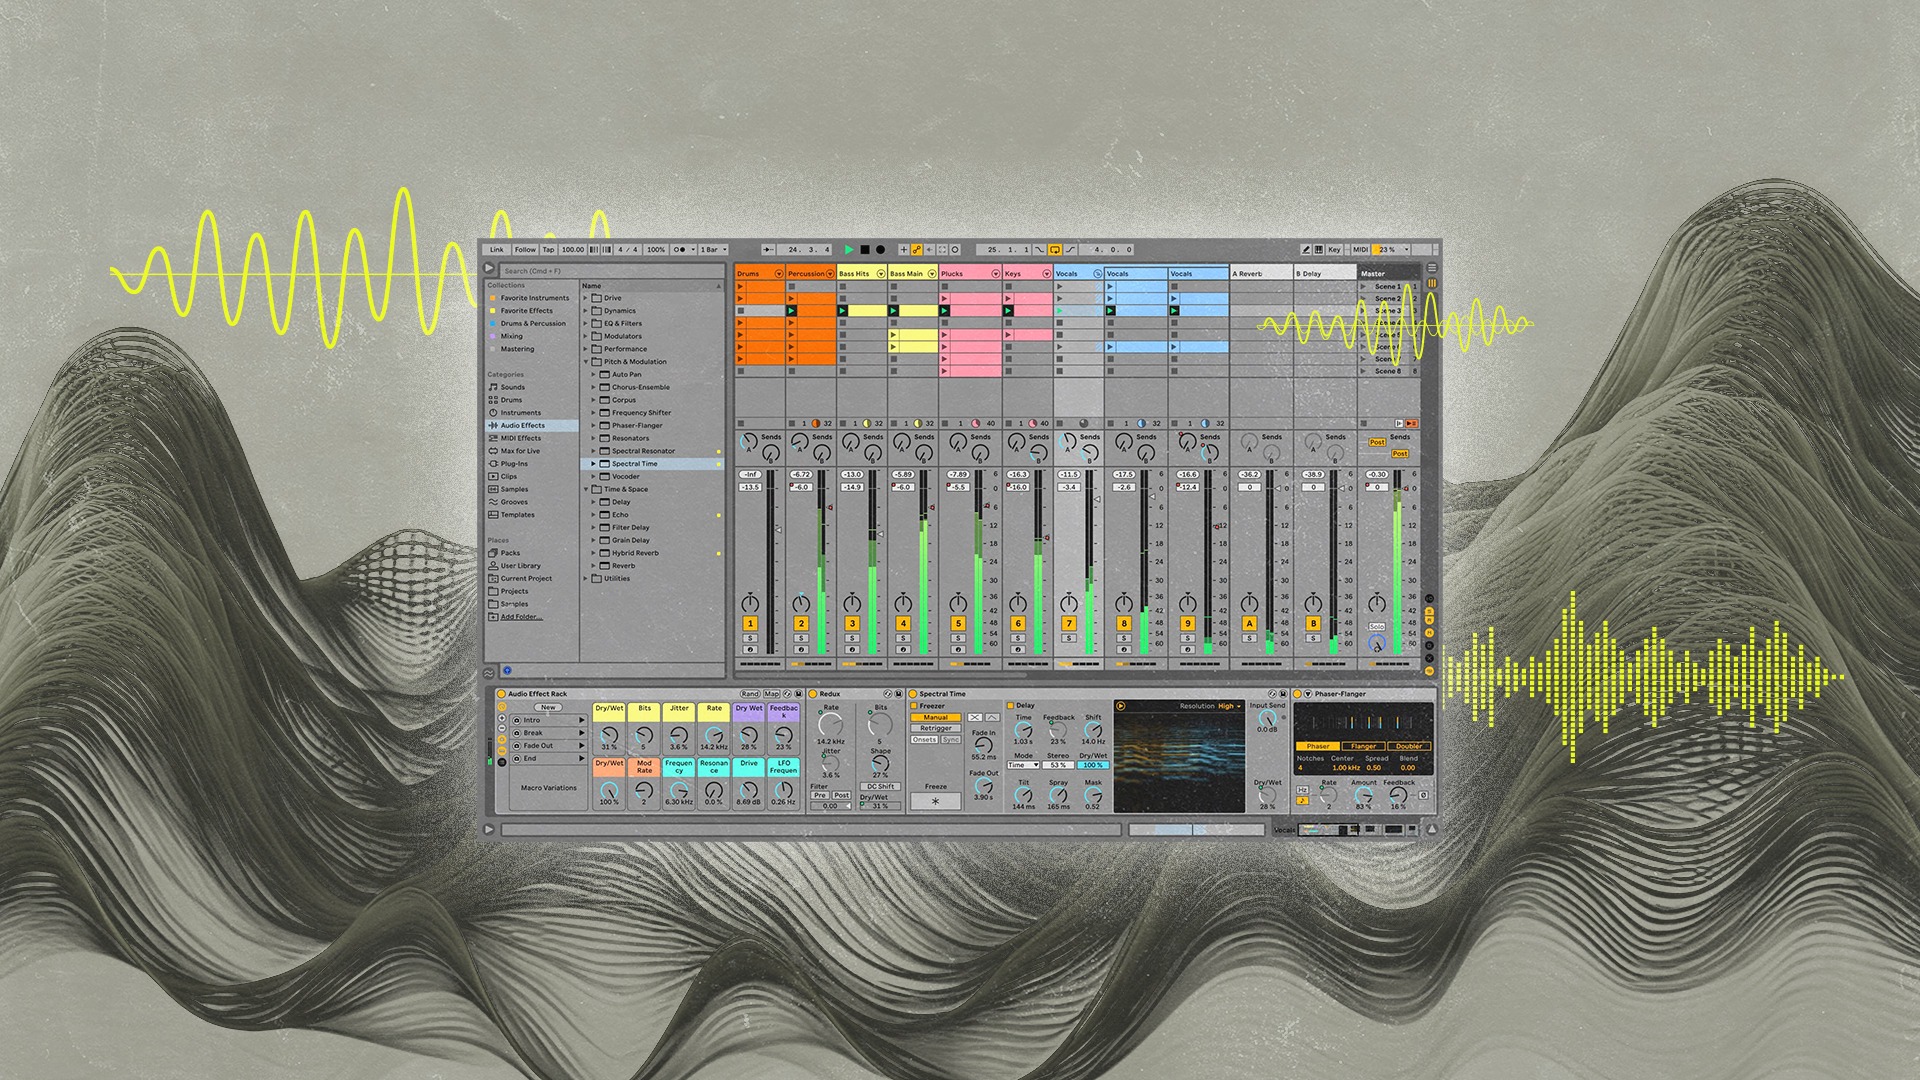
Session view vs. Arrangement view
A major difference between Ableton Live and other DAWs is the unique Session view.
A major difference between Ableton Live and other DAWs is the unique Session view.
Session view lets you build your track with a grid of short clips, rather than a left-to-right timeline.
You can trigger clips individually or in rows called scenes. You can even mix and match scenes and clips to create new and evolving arrangements on the fly.
When you trigger a clip to play, it begins playing on the bar or beat so that everything stays in sync—even as you improvise and jam with your arrangement.
It’s a satisfying workflow, but you can still use Arrangement view for classic timeline-style editing when needed.
How to buy Ableton Live
Live comes in three versions, with a budget tier available for those who aren’t ready to buy the complete edition.
Live comes in four versions, with a budget tier available for those who aren’t ready to buy the complete edition.
Here’s the simplest breakdown of each tier:
- Live Lite: Comes bundled for free with a wide range of software and hardware products
- Live Intro: Perfect for those wanting an upgrade from the limitations of Lite
- Live Standard: Has all the main features, but fewer instruments and effects than Suite
- Live Suite: The complete edition of Live
Live is powerful software, and the flagship edition comes with a heavy price tag. But don’t think that means that the other versions aren’t useful.
On the surface, Live Lite may seem limited, with only eight available tracks. But sometimes limitations can boost creativity—especially when you’re just getting started.
Plus, you can always add your own free VST plugins to your collection for more sonic variety.
We also have a guide that will help you get the most value possible from Live Lite.
How to learn Ableton Live
Learning Ableton Live might seem intimidating if you’re just getting started with music production.
But Live is actually one of the most intuitive DAWs out there.
You may find that the easiest way to pick up the basics is to just jump in and get started.
If you start with a simple goal like making a drum pattern or using a virtual instrument, you’ll start to pick up the basics along the way.
But as you progress, you’ll likely want to build on your skills and get serious about your command of Live.
LANDR Learn offers deep lessons in Live from top Ableton certified trainers.
Check out our curated intro courses as well as deep dives on workflow and creative techniques for every genre.
Getting started with Live
Live has many of the same workflow elements as other major DAWs. But if you’re not familiar with these already, let’s go through the basics and explain exactly how they work in Live.
Tracks
Tracks are where you’ll add the individual elements in your session. In Live you can create MIDI Tracks and Audio Tracks.
Audio Tracks deal strictly with audio, whether it’s in the form of samples, stems, loops, or one-shots.
MIDI Tracks contain the information that tells software instruments what notes to play and how to play them.
To hear sound from a MIDI track you’ll have to add a VST synth, sampler or other virtual instrument to play the parts.
Mixer
The lower portion of each track column in the Session view contains the mixer controls.
This is where you’ll set level, panning, send effects, solo/mute and record arm for each track.
If you need to know more about how these choices affect your sound, head over to our in-depth guide to mixing in Ableton get started.
You’ll also be able to select I/O options to determine audio routing and MIDI options for each track here.
Instruments and effects
Software instruments and effects in Ableton Live appear along the bottom of the window in both Session and Arrangement views.
Software instruments and effects in Ableton Live appear along the bottom of the window in both Session and Arrangement views.
You can drag and drop them here or on the track itself to insert them on the channel. From there you can create a chain of effects and change their order in a simple left-to-right signal flow.
Playing and recording
In Session view, playback or recording starts when you click the transport icon in a clip or slot’s left side. The slots in the Master section trigger entire horizontal rows of clips called scenes.
When the track is record-armed the slot will display the circular record icon. If there is a clip already in the slot you’ll see a play icon. If there’s nothing in the slot you’ll see a stop icon.
Clips launch on the bar or beat so they play back in time with the music. If you see a flashing light before the clip plays, that’s because it’s waiting for the next interval to start playback.
In the Arrangement view all you need to do is arm a track and press record in the main transport, just like a classic DAW.
This is the set of icons with the standard stop, play and records symbols in the center of the top panel.
Here you’ll find other essential features like tempo, time signature, quantize value, section looping, punch in, CPU load and more.
Best Ableton Live instruments
An intuitive and flexible workflow is one of the biggest draws of Ableton Live, but many producers swear by the built-in plugins and virtual instruments that come with it.
In fact, many insist that they’re so good you’ll never need to reach for expensive third-party plugins.
Ableton Live features a large collection of stunning synths and samplers, but here’s an introduction to some highlights.
Simpler
Simpler is one of the best-loved instruments in Live. It’s a deceptively simple sampler that puts the most inspiring sound design features up front.
Just drop any piece of audio directly into the instrument and start chopping it up!
Operator
FM synthesis is sometimes considered the most complicated synthesis type.
Even so, Operator makes it approachable and fun with its usable interface and great sound.
If you’ve always been scared of FM, or you’re looking to switch it up from analog-style tones, you’ll love using Operator.
Analog
Speaking of analog, every producer needs a nice vintage synth in their arsenal.
Ableton’s take on virtual analog synthesis delivers all the old-school goodness you’d expect from a great analog synth.
Wavetable
Rounding out the synth collection is the versatile Wavetable plugin.
This flexible synth type lets you use a huge variety of different oscillator waveforms to build stunning modern and classic synth sounds.
Electric
Is there any sound more groovy than an old-school electric piano? Maybe not, but Electric comes close with its interesting approach to mimicking classic instruments based on physical modeling.
This instrument was built in collaboration with plugin developer AAS, based on the technology behind their excellent electric piano plugin Lounge Lizard.
Best Ableton Live effects
Live offers excellent built-in instruments, but it also comes packed with a powerful suite of audio effects.
Live offers excellent built-in instruments, but it also comes packed with a powerful suite of audio effects.
Between the two, Live is a powerful sound design tool right out of the box.
Here are some of the coolest effects in Live:
Beat Repeat
Beat Repeat is a glitch effect for generating stuttering sampler sounds.
Easily tweakable and always capable of surprising results, Beat Repeat can transform ordinary loops into skittering, glitched-out sounds.
Glue Compressor
Glue Compressor is an excellent take on old-school console bus compression.
It’s the type of natural compression that easily adds punch, weight and yes…glue to drums, busses and entire mixes.
Corpus
Corpus is a unique resonator effect based on principles from physical modelling synthesis.
If you ever have a sound that needs more harmonic interest, Corpus can generate it out of thin air.
It’s one of the more interesting effects in Live.
Grain Delay
Grain Delay is a pitch shifting delay that will take your sounds into granular synthesis territory.
It grabs tiny segments of the input signal and mangles them in ways that can lead to completely new tones and textures.
Hybrid Reverb
Hybrid Reverb is an innovative effect that combines the best of two different reverb methods—algorithmic and convolution.
It provides the realism of impulse responses with the dreaminess of reverb algorithms in one stylish package.
Best Ableton Live features
So far I’ve barely scratched the surface of what Live is capable of.
In fact, the deep features that really make it stand out aren’t always obvious at first.
I’ll go through some of the most useful other features in Ableton Live you should know about.
Warp function
Warping in Live means adjusting the tempo of a clip without changing its pitch.
It’s the central feature for working with audio in Live that’s been around since its earliest days.
Warp makes it possible for any audio you bring into your session to play along in time with your song’s tempo.
Warp makes it possible for any audio you bring into your session to play along in time with your song’s tempo.
It’s a dream feature for DJs and producers working with samples or entire tracks, but it can also be a creative tool for transforming clips into new sounds.
There are multiple modes and options to make sure your clips sound just right at even extreme settings.
Once you get used to it, Warp will change how you view the creative potential of audio files.
Racks

Get 10 Drum Racks Pre Made for Ableton! Read - Ableton Racks: How to Use Them & 10 Ableton Drum Racks You Need
Live is one of the best DAW environments to get creative with instruments and effects.
You can do plenty with its built-in processors in regular insert chains, but things get crazy once you get started with Ableton Racks.
Racks are entire chains of instruments, processors and effects that can be routed in extremely flexible ways.
Multiple parallel signal paths are possible within a single Rack—Racks can even contain other Racks!
It can get complicated fast, so Racks have convenient macro controls that let you access the most important parameters directly.
Try some of Live’s pre-built Racks to get a feel for the possibilities.
Max for Live
Remember how Live started its life as a patch inside MaxMSP? Now it’s come full circle—you can run a version of Max inside Live itself!
Technically speaking, Max for Live is a visual programming language for music. You connect objects with patch cables kind of like a modular synth.
From there it gets complicated, but M4L is just as powerful and flexible as Max standalone. Luckily, you don’t have to know it works to use it in your workflow.
There’s a huge community out there building and sharing Max for Live patch files. You’ll find everything from unique effects to full instruments on platforms like maxforlive.com
Groove pool
If there’s one common complaint about basic MIDI drum patterns or basslines, it’s that they lack human feel. That’s where DAW groove comes in.
Ableton Live’s groove pool feature is like a virtual library of different rhythmic vibes.
Ableton Live’s groove pool feature is like a virtual library of different rhythmic vibes.
Simply drag a groove onto a clip to apply it and adjust its parameters from within the groove pool. Here you’ll see every active groove at once so you can tweak them to fit the song.
If you spend a bit of time working with it, you’ll never go back to stale quantized loops again!
Follow actions
Live’s Session view grid opens up new possibilities for loop-based songwriting. For example, follow actions let you assign behaviours that chain clips together in interesting ways.
You can have clips play one after the next, restart from the beginning, play randomly or take an action based on chance.
If you’re looking to break out of boring workflow patterns, this feature will certainly help you shake it up!
Ableton Link
Ever wished you could jam along with other musicians using just your laptop?
In the past, it was nearly impossible to synchronize two independent computer music setups running on separate DAWs.
That’s why the Ableton team developed Link. It seamlessly syncs tempo and timing for DAW users on the same local internet network.
Simply enable the Link feature in the top left of the session view to auto-add users of link-enabled software to your session.
Link even works across apps, with support now offered for mobile music tools as well as traditional DAWs like Pro Tools.
Ableton Push
Live is known for its powerful performance features. Many musicians rely on it for live shows that include electronic elements.
But Live’s capabilities go even further when combined with Ableton’s proprietary hardware controller, Push.
This grid-style USB pad controller gives you hands-on access to all the essential performance and playback actions you need to break away from the mouse and keyboard.
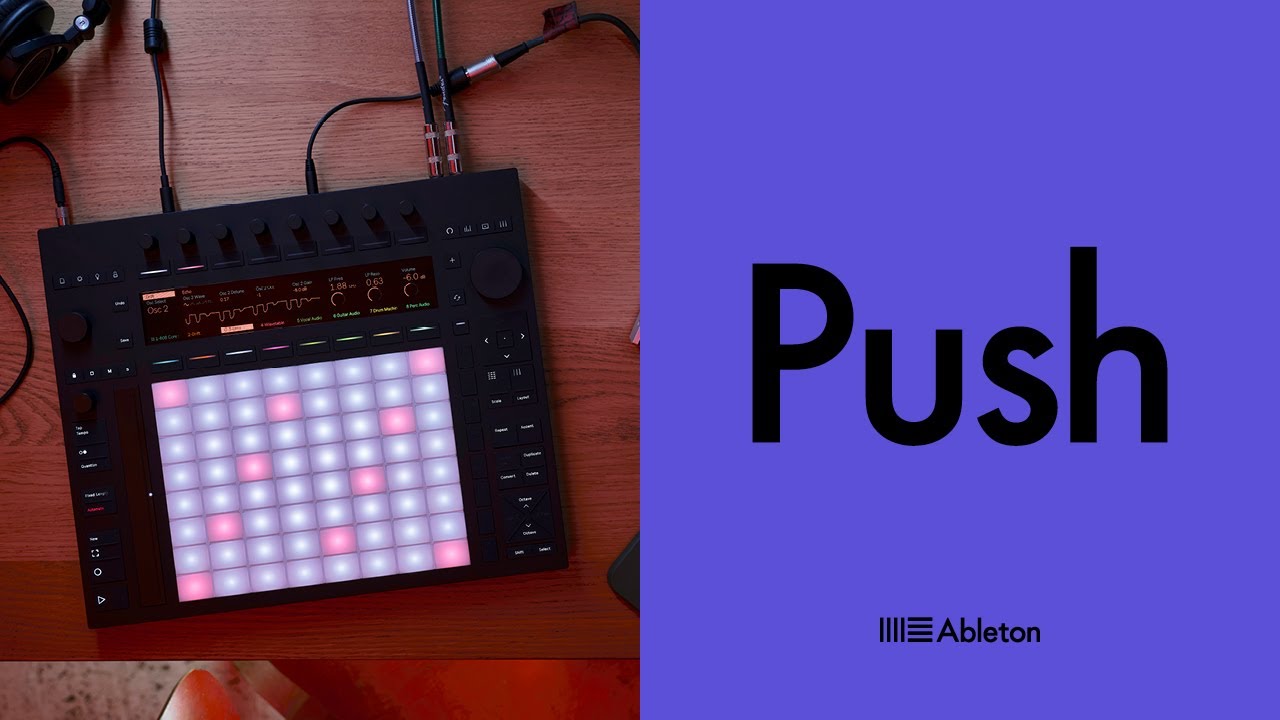
Ableton's launch video for Push 3.
And as of Push 3, you can even use the controller as a standalone device. It places the core functions of live at your fingertips with no computer needed.
If you love the tactile feel of hardware gear but need the flexibility of Live, Push is among the best options available.
Live and loud
Choosing a DAW is a highly personal decision.
There are plenty of factors that you’ll have to take into account before you take the plunge.
But Ableton Live is one of the most solid options out there for new and intermediate producers.
Now that you have an idea of what it can do, go try using Live in your own workflow.

Michael Hahn is an engineer and producer at Autoland and member of the swirling indie rock trio Slight.
@Michael HahnGear guides, tips, tutorials, inspiration and more—delivered weekly.
Keep up with the LANDR Blog.