Mixing Drums: How To Get a Powerful Drum Sound in 7 Steps
Mixing drums is one of the most satisfying parts of music production.
Drums propel the rhythmic action of a song and getting them right is a great feeling. But mixing a good drum sound can be hard when you’re just getting started
Even so, you can get results if you know how to apply a few key techniques.
In this article I’ll show you how to get a powerful and punchy drum mix in 7 steps.
Let’s get started.
1. Create busses to organize your tracks
The first step to mixing drums successfully is to set up your tracks right.
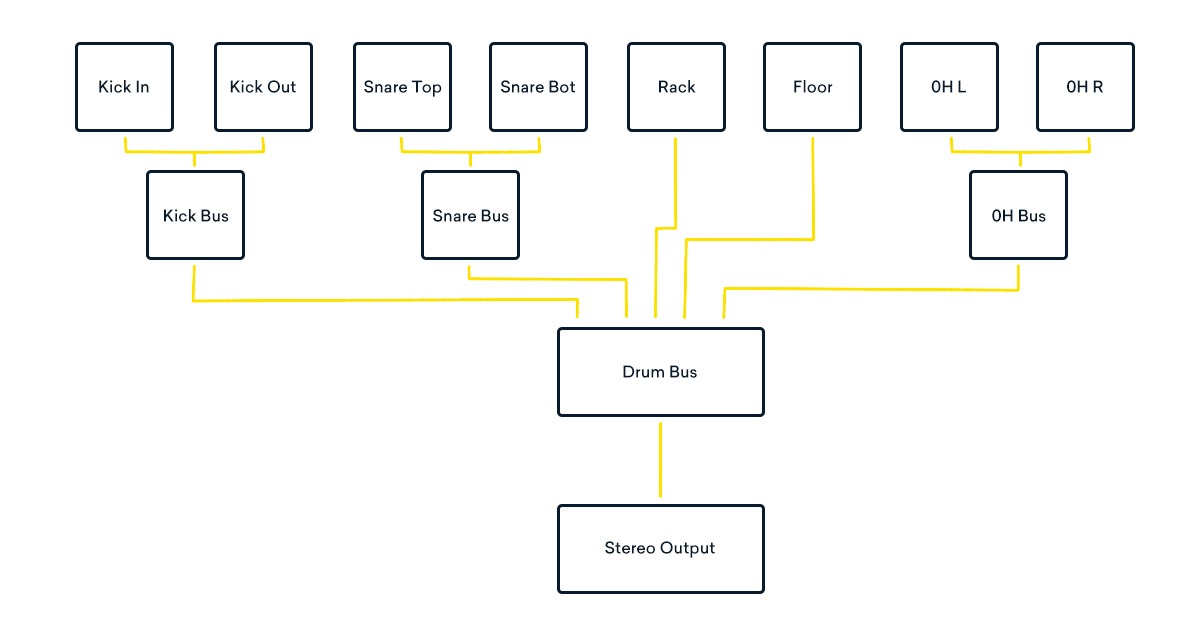
That means creating busses to organize the tracks and process them in the right places.
To start you’ll need a main stereo bus for the entire drum mix.
The first step to mixing drums successfully is to set up your tracks right.
With the output of your individual mics routed to this aux channel you’ll be able to apply processing to the entire drum sound and adjust it’s overall level.
You should also create mono busses for any drums that have been mic’d with multiple microphones, like if you used a snare top and bottom mic.
Set these busses to output to the main drum bus as well.
Finally, you should create a separate bus for the left and right overheads so you can adjust them independently.
Here’s a diagram of drum tracks properly bussed out for mixing.
2. Use expansion for extra punch
When most engineers record drums, they place microphones in the room, over the drummer’s head and up close on each individual element of the kit.
The close mics are how you turn up specific sounds like the kick and snare to work best in the mix.
But no matter how well they’re placed, drum close mics will capture some bleed from the other sounds in the kit.
The close mics are how you turn up specific sounds like the kick and snare to work best in the mix.
If the bleed is too loud, you won’t be able to push the close mics up in the mix without adding distracting background spill from the cymbals.
To reduce it you can use expansion.
An expander is like a compressor in reverse—it reduces the level of the signal when it drops below the threshold instead of when it goes above.
You might know about expanders if you’ve ever used a noise gate. Many engineers use gates on drums, but they can make the drums sound choked and unnatural.
In most cases you don’t need to completely remove the background noise—just decrease it enough so that it’s not interfering with your mix.
Here’s a nice explanation of how you can use expansion to clean up drum close mics.
Try expansion on your close mics if you need cleaner, punchier sound from your kick, snare or toms.
3. Compress in parallel to add weight
Compression is important for mixing drums, but it can be easy to go too far.
Heavy compression can sound great when the drums are solo’d, but it can make them disappear in a full mix.
So how do you get the sonic benefits without losing the punch? Compressing in parallel is your best option.
To do it you’ll need a compressor plugin with a mix knob or a separate send and aux return channel for your compression sound.
With the compressor set up in parallel you can use an aggressive setting that adds weight and power to the sound and blend the natural transients back in.
Here’s an overview on parallel compression to get you started:
4. Add reverb to create ambience and depth
Drums are acoustic instruments that you normally hear in a reverberant space. That means they need some ambience to sound natural and three dimensional.
Many engineers rely on microphones placed at a distance to create these qualities. But if you don’t have those, reverb plugins can work just as well.
Drums are acoustic instruments that you normally hear in a reverberant space. That means they need some ambience to sound natural and three dimensional.
You’ll have to create another bus to send the drum tracks to a reverb plugin. To make it convincing you need to be careful with the blend of sources you send.
In the past it was common to send only the close mics to the reverb, but this can result in a slightly strange ambience texture.
With expansion on these mics the effect is even more pronounced—it’s a specific sound that was popular in the production style of the 80s.
If you don’t have any room mics, I recommend adding subtle reverb to the overheads instead of only to the close mics.
5. Use saturation to stand out in the mix
So far the drums are sounding nice and clear with solid power and convincing ambience.
But even then you might struggle to push them forward in the mix. One way to put your drums right up front is with harmonic saturation.
This is the subtle distortion that adds complex harmonics to your sound and makes it more present in the mix.
Saturation is the subtle distortion that adds complex harmonics to your sound and makes it more present in the mix.
Most plugins that create this type of distortion are based on analog hardware. Old electronic components like tubes, transformers and magnetic tape are famous for their pleasing sound.
Engineers used these processors to enhance their mixes with saturation.
Here’s a nice clear example of how a tape machine plugin can push the midrange and add pleasing saturation to the sound.
6. Blend in samples for texture
The DAW era gave engineers access to many new tools to enhance their mixes.
It’s common in many genres to replace individual hits in the drum mics with samples to change their sound.
If you’ve followed this guide and your drums still don’t have enough impact, you might consider this approach to help fix it.
To trigger samples with your drum mics you’ll need a sample replacement plugin.
These plugins detect the transient of the incoming audio and play a sample back when the level hits a certain threshold.
Replacing every single hit in your drum mics is pretty extreme, but subtly blending in samples with your real drums is a great way to reinforce them.
Here’s an easy way to trigger samples with your drum mics using built-in tools in Logic Pro X.
7. EQ your drums to match the rest of the mix
You might be surprised that I’ve left EQ for last in this tutorial.
But if you can get your drum mix sounding good using the techniques in the previous steps you might not have to do much EQ at all.
Besides, every mix is different and it’s hard to give advice about which specific frequencies you need to address in yours.
Despite that there are some common places to add EQ while mixing drums:
- Use a high-pass filter on the main bus to clean up the lowest frequencies (< ~40 Hz)
- Carve out the woofy 250-350 Hz area of the kick drum to make room for the bass
- Boost between 5 kHz and 8 kHz on the snare to bring out the “crack”
- Gently boost the kick around 55-65 Hz to bring out the fundamental
- Gently boost the overheads between 10-12 kHz to bring out the “air”
Here’s some more info on how the low elements in your mix like your kick drum and bass sounds interact:
Powerful drum sounds
Everyone wants a bold, punchy drum sound that pushes the track forward.
With the techniques from this article you’ll have a strong head start on getting your drums right.
Now that you have some ideas for mixing drums, get back to your DAW and keep working on your mix.
Gear guides, tips, tutorials, inspiration and more—delivered weekly.
Keep up with the LANDR Blog.

