Microphone Polar Patterns: How to Use Your Mics Better

Microphone polar patterns have a big impact on the sounds you record. But they can be pretty confusing.
When I was making my first recordings I didn’t know anything about microphones—or how they work.

Unlimited mastering & distribution, 1200 royalty-free samples, 30+ plugins and more! Get everything LANDR has to offer with LANDR Studio.
But I had a big breakthrough when I started to understand microphone polar patterns and how they affect the characteristics of the tracks you record .
What are microphone polar patterns?
Microphone polar patterns describe the way a microphone’s element picks up sound from sources positioned around it.
Knowing how a microphone’s polar pattern works will help you position it the right way to get the sound you want.
What happens when you point a microphone in one direction or another? Most of us probably have an intuitive idea of what it might sound like—but what’s really going on?
In this article I’ll explain everything you need to know about microphone polar patterns and how to use them to make your recordings better.
Microphone nulls and proximity effect
The five microphone polar patterns are omni, cardioid, supercardioid, hypercardioid and figure eight.
I’ll get into to each of them in detail in a second, but to understand polar patterns there’s a few things we have to get out of the way first.
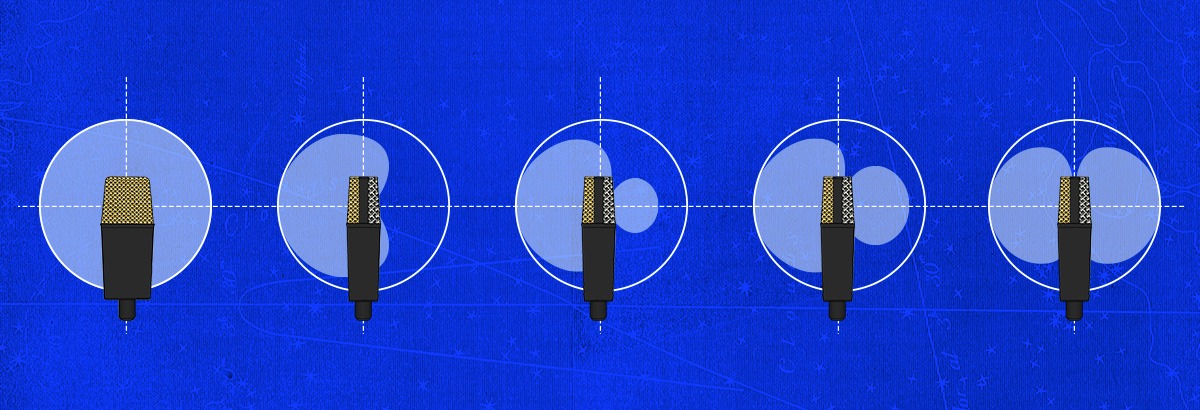
If you have a variable pattern microphone like one of those we recommend as the best beginner microphone, you might be familiar with the polar pattern diagrams on your mic.
They’re often represented as portions of a circle. Throw that analogy out the window. Polar patterns are three dimensional. They’re portions of a sphere not of a circle.
Polar patterns are three dimensional. They’re portions of a sphere not of a circle.
When you see them with a microphone for reference, it starts to make more sense:
That brings us to my next point: nulls. The polar pattern tells you what a mic will pickup, but what’s even more valuable is knowing what it won’t capture.
Looking at the example you can see that the figure eight pattern completely rejects sound at 90 degrees off axis!
Other patterns have their own areas of low sensitivity. These positions are known as the the microphone’s null points.
Later I’ll show you how you can use your mic’s nulls to your advantage. But for now let’s move on to the last polar pattern issue: proximity effect.
Proximity effect means that the intensity of the low frequencies a microphone captures increases the closer it’s placed to the source. Different polar patterns exhibit different amounts of proximity effect.
Between exploiting your microphone’s nulls, polar pattern and proximity effect, you actually have a huge amount of control over the sound you capture to your DAW—before you even think about using plugins!
This is what engineers mean when they say “get the sound right at the source.” Mic technique is how you get there—and to master it you’ll need to know your polar patterns.
1. Omni
Let’s start with the simplest one.
The omni pattern captures sound at equal intensity in all directions. That’s why it’s sometimes called omni-directional.

True omni mics exhibit no proximity effect. That means you can place an omni mic as close to a bassy source as you want, and not capture too much low end!
It also makes them realistic sounding and less sensitive to positioning than other microphones.
The drawback is that it’s much harder to deal with instrument bleed or excessive room sound since an omni mic will “see” everything around it.
2. Cardioid
Microphones with a cardioid pattern will pick up a broad range of sound in front of their element, some at the sids and considerably less to the rear.

The null of a cardioid mic is directly at the back, or 180 degrees off-angle.
Cardioid microphones have moderate proximity effect, making them a great choice for adding body to up-close vocals for that “voice of god” effect without things getting out of hand.
3. Supercardioid
Supercardioid is a variation on the cardioid shape with a tighter front pickup angle and a slight sensitivity at the rear.

Supercardioid offers better rejection than cardioid at the sides, with nulls at 126 degrees off-axis and more pronounced proximity effect.
4. Hypercardioid
Hypercardioid is an even tighter variation on supercardioid. Hypercardioid microphones are extremely directional and highly sensitive to mic placement.

Their nulls occur at 110 degrees making their front-facing capture quite narrow.
Hypercardioid mics are even better at rejecting sound at the nulls than supercardioid and have a more pronounced proximity effect.
5. Figure eight

The figure eight pattern offers tight front and rear pickup with nulls at 90 degrees off-axis.
Figure eight microphones offer the best rejection at the nulls, which are conveniently easy to locate at a 90 degree angle.
Figure eight mics are great for distance mic’ing since you can simply rotate the microphone away from the source to capture more room reflections without increasing the time delay between the mic and the source by moving the microphone further back.
Better positioning with patterns
If you’ve ever recorded a live drum kit, I’m sure you know what I’m about to talk about…
Bleed from bad microphone positioning can turn mixing into a nightmare.
Bleed from bad microphone positioning can turn mixing into a nightmare.
Excessive cymbal spill in drum close mics can make it impossible to turn up one element of the kit without getting a huge amount of everything else.
If you’re in this situation, trying to get a few more dB of rack tom often means you’ll also be getting a large dose of harsh, unusable cymbal splash.
It’s the same problem if you’re tracking a singer/songwriter who likes to play guitar and sing at the same time.
The trick is to use the nulls of your microphones to capture what you want, and reject what you don’t.
And that means knowing what mic to use when and where to place it.
Unlimited mastering & distribution, 1200 royalty-free samples, 30+ plugins and more! Get everything LANDR has to offer with LANDR Studio.
Try to choose and position your mics so that anything you need to minimize sits comfortably in the null positions.
Consider the proximity effect as well. If you’re looking to beef up some low end, proximity effect can help you get it right at the source.
Polar pattern recognition
Understanding polar patterns is a game-changer for your mic technique. Correct microphone choice and placement can mean the difference between a great mix and a time-consuming uphill battle.
Once you start paying attention to how you use the pattern of your mics, you’ll be thinking about your mix before tracking even starts—and getting a better final product!

Michael Hahn is an engineer and producer at Autoland and member of the swirling indie rock trio Slight.
@Michael HahnGear guides, tips, tutorials, inspiration and more—delivered weekly.
Keep up with the LANDR Blog.