Limiters: Should You Use Them in Your Tracks?
The two most important aspects of sound in mixing are dynamic range and frequency balance.
When it comes to controlling frequencies in your mix, EQ is your main tool.
But when you dial in your dynamics there are more options—gates, expanders, compressors and limiters.
Of those four, limiters are perhaps the least well understood.
In this article I’ll explain what a limiter is, how it’s different from a compressor and when you should use one in your mix.
Let’s get started.
What is a limiter?
A limiter is a hardware or software audio processor that stops a signal from increasing in loudness above a set threshold.
You can think of a limiter like a compressor with an extremely high ratio—∞:1 to be exact!
I’ll go over the basics in this article but if you need a refresher on compressors and dynamic range, check out our guide to audio compression.
Looking at the graph for a limiter you can see how the two types are related:
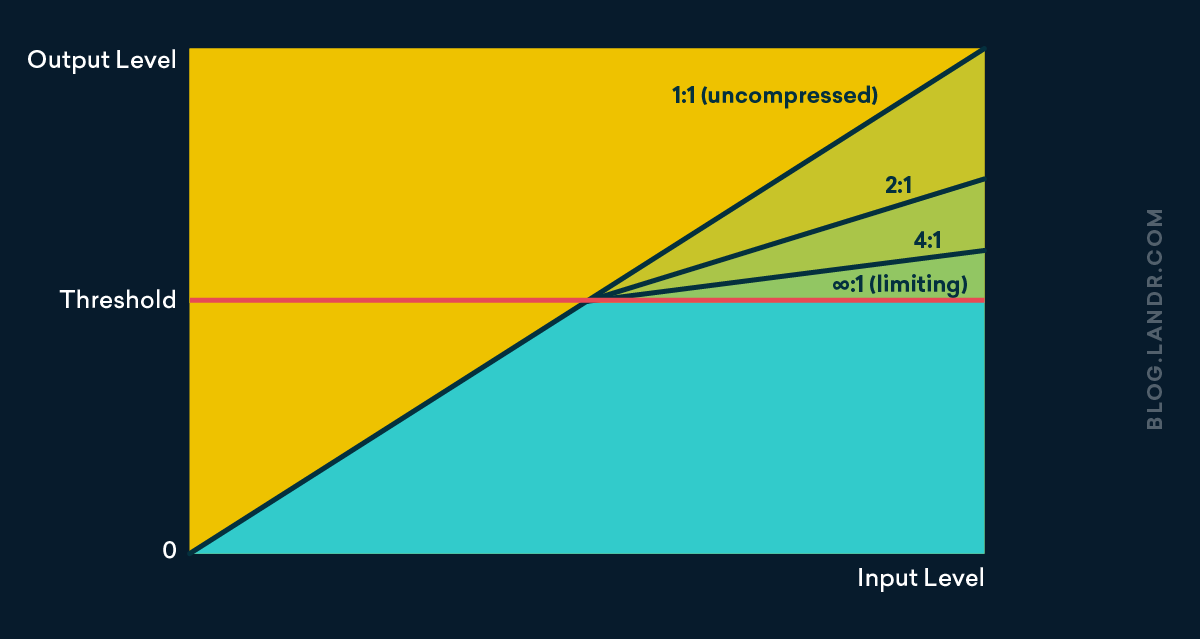
As the ratio increases, so does the amount of gain reduction that occurs when the input signal passes the threshold.
Where a compressor would only attenuate the signal above the threshold, the limiter won’t let any material through.
Compressors typically have ratio settings of 1.5:1-10:1, but true limiters always have the same ratio of ∞:1.
Compressors typically have ratio settings of 1.5:1-10:1, but true limiters always have the same ratio of ∞:1.
Limiter settings
Limiters feature similar controls to many compressors.
The threshold sets the level where the limiter will begin work. Bring this down until the limiter begins stopping the signal where you want it.
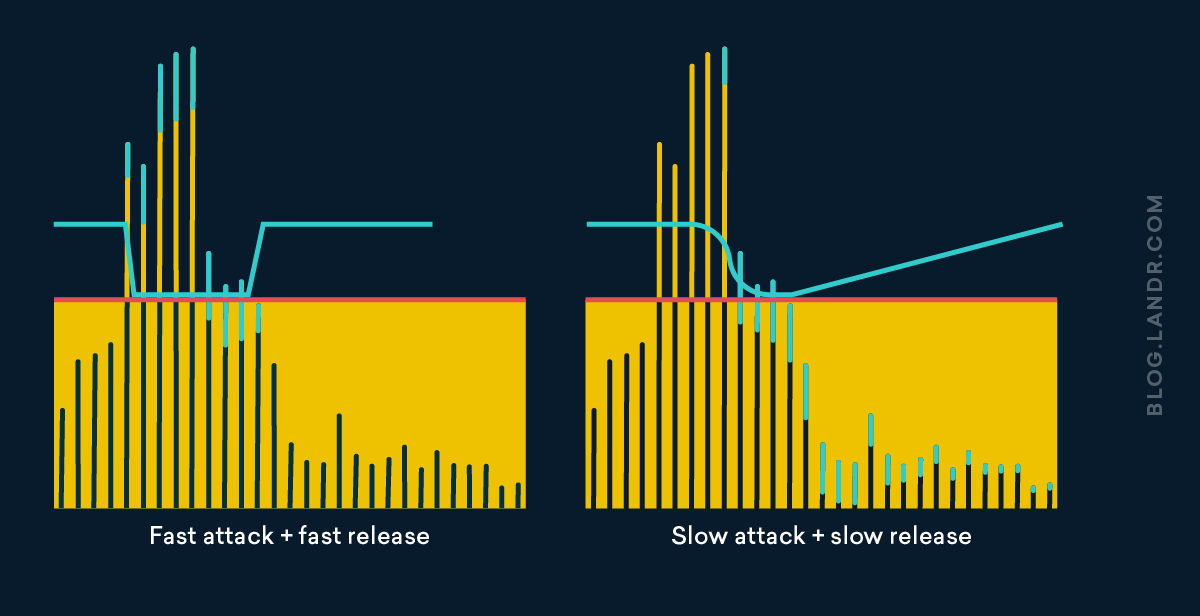
The attack and release settings control the timing of the gain reduction—how fast or slow it comes in or out.
Slow attack times mean the limiter will kick in more gradually, letting more of the initial transient of the sound through.
Fast attack settings sound aggressive and clamp down on the signal almost immediately.
Fast release settings bring the gain reduction out quickly after the signal decreases below the threshold. This can enhance the feel of rhythmic material when set correctly, but creates an unnatural pumping sound if you’re not careful.
Slower release times gradually ease off on the gain reduction and can sound more transparent.
Limiters sometimes include a knee control that makes the onset of the limiting more gradual. But this is less common since most of the time you’ll be using a limiter to stop a signal in its tracks.
Finally, since their effect can be so extreme, limiters often feature a lookahead control that allows them to close down on the signal a few milliseconds before the transient.
This can help when fast attack times sound unnatural but you still need to limit the earliest moments of a signal.
When to use a limiter
Limiters can be used in any situation where you need to cap the intensity of a signal at a defined level.
For example, they can work well on percussion in situations where some hits are much louder than others and need to be tightly controlled.
This can happen on vocals as well if the singer’s style is extremely dynamic. Try using a limiter if other methods like automation or clip gain aren’t working.
Some engineers use analog limiters or DSP limiters while tracking to ensure that stray peaks don’t clip the recording medium. This is much less common with the high headroom available in digital recording.
Avoid limiting on the way in unless you’re extremely confident with your gear or you’re recording a highly dynamic source.
Master bus limiter: should you use one?
Probably the most common use for limiters is on the master bus of your entire mix.
Some producers do this on every session, but the practice is considered pretty controversial. Here’s why.
Adding plugins to your master bus can create sweeping changes in your mix very quickly.
This is completely fine if you’re only adding a band or two of EQ to sweeten the mix, or a few dB of gentle compression for extra weight.
Any master bus processing like this that gets you closer to the feel and character you want for your track shouldn’t cause any problems.
But as soon as you cross over into big changes like limiting, you can do real damage.
A limiter is a very aggressive way of reducing the dynamic range of a signal. Once you flatten those dynamics, you’ll never get them back.
A limiter is a very aggressive way of reducing the dynamic range of a signal. Once you flatten those dynamics, you’ll never get them back.
And many limiters are designed to trade those dynamics for extra level at the output. After all, the less dynamic the signal, the closer to the available max you can push it.
This is one way that limiters work during the mastering process. But using limiting to reduce dynamic range and boost levels during your mix is always a bad idea.
The tools used in the mastering process are far better equipped to take care of this delicate job of raising levels and turning headroom into raw volume.
If you limit your mix so hard that there’s nowhere left to go, there won’t be any space for the mastering processors to work their magic.
If you limit your mix so hard that there’s nowhere left to go, there won’t be any space for the mastering processors to work their magic.
And when you get close to the maximum like this, other issues come out of the woodwork too.
Does your limiter handle inter-sample peaks correctly? Does it have effective oversampling to deal with aliasing and lookahead? What about pre-ringing?
These issues are complicated and technical but you can avoid them completely by skipping the limiter on the master bus.
The bottom line? Leave master bus limiting to the mastering process and be careful how you use plugins on your entire mix.
The sky’s the limiter
Limiters are just like any other tool in music production—they play an important role in a good mix when used properly.
Now that you know how limiters work and when they’re needed in a mix, get back to your DAW and keep producing.

Michael Hahn is an engineer and producer at Autoland and member of the swirling indie rock trio Slight.
@Michael HahnGear guides, tips, tutorials, inspiration and more—delivered weekly.
Keep up with the LANDR Blog.