
How to Get More from Your Samples Using Transposition
A step-by-step guide to pitch-shifting, finding the key and warping.
When you’re working with samples, the pitch is key!
You found that perfect sample, but there’s one problem… It doesn’t fit with the key of your track. Or maybe it would sit better in the mix in a different pitch.
Producers like Jacques Greene or Burial have made a craft out of chopping and pitching vocal samples. It’s a valuable and versatile skill in the studio that any seasoned producer needs to know.
Your DAW gives you the power to easily change the pitch of an audio sample without losing the quality of the audio—even change the key of a whole song. There’s even a name for it:
Transposition.
This technique comes in handy not only for individual samples. Use it to shift the key of a whole instrumental track to accommodate a singer’s vocal range. Or transpose that old synth line for the new track you made in a different key. The possibilities are endless!
So what is it? How does it work? And why should you care? Well, let’s dig in!
What is Transposing
When you first get into sampling, the first thing on your mind is: How do I change the pitch of a sample?
Say hello to transposing, the sampling wizard’s best friend. Transposing means moving an audio sample (or set of MIDI notes) up or down in pitch. This is done by semitone (st) increments.
Transposing allows you to make any recording the pitch and key you want it to be—no need to record again or scrap that cool sample you found.
But before we get into how you do it, let’s brush up on some basic music theory.
What is a Semitone
A semitone (also called a ‘half step’ or ‘half tone’) is the smallest interval—or distance—between two notes in Western music.
On a piano or keyboard, the difference between two neighboring keys is a semitone. Most of the time, that means going from a white to a black key. The only exception is E ⇄ F and B ⇄ C because there’s no black key between them. Those are semitones even if you’re going from a white key to another white key.
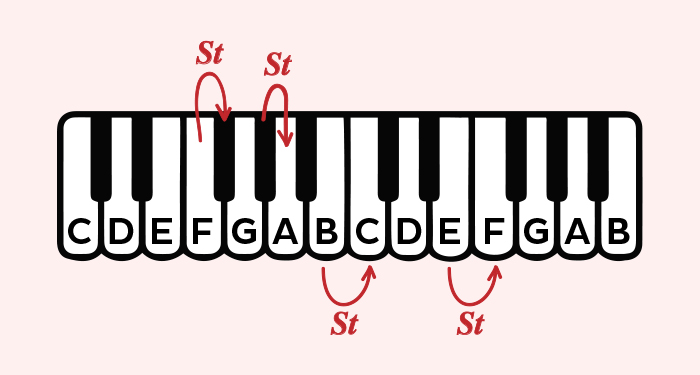
A tone (also known as a whole tone or a whole step) is made up of two semitones.
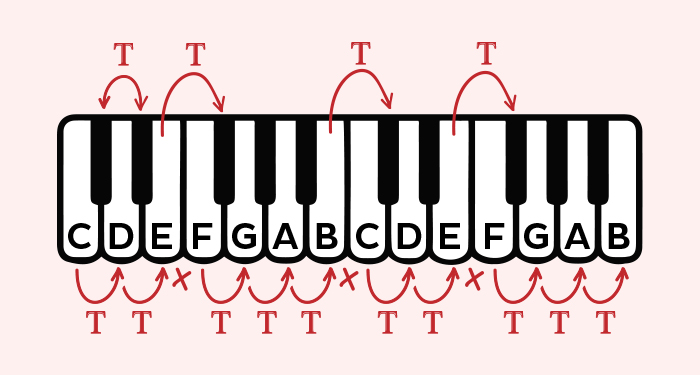
Remember that when you’re pitching something up or down with transposition, you’re bumping it up by a semitone (st) each time.
For example: if you want to change your sample that’s in C to a D (a whole tone), you’d have to bump it up by two semitones.
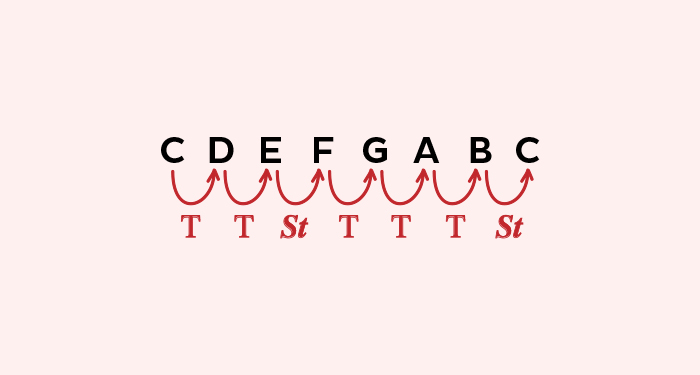
Knowing semitones and tones is very handy when you’re trying to memorize scale formulas (like a Major scale below) and play any key in any mode. But we’re getting off topic here!
How to Change Pitch without Messing with Tempo
So back to our task: pitching samples in your DAW.
In the physical world, the relationship between pitch and tempo is the following: you speed up the tempo, things start sounding like chipmunks (pitch also goes up). You slow down the tempo, things start sounding deeper (pitch goes down). Try doing that on a record player and you’ll hear it.
If every time you pitch-shift a sample the tempo changes, timing will get out of sync real quick.
Another issue: When you mess with pitch, the sample can get glitchy and lose quality.
So here’s how to change the pitch of a sample while keeping the same tempo AND the quality of the sample:


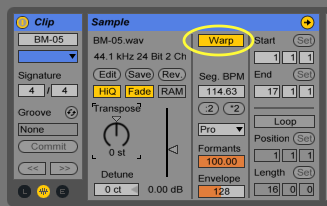
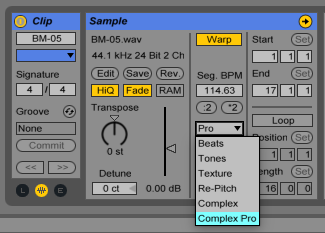
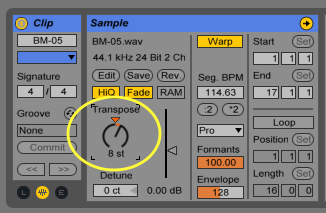
- Prepare your samples so they sound good and loud enough
- In your DAW (we’ll be sampling in Ableton Live), make sure the Master Tempo is set at the tempo of your sample (or your desired track tempo):
- Click and drag your sample into an Audio Clip and click on it:
- Turn on Warp. This stretches your sample to keep the tempo intact:
- Click on ‘Pro’ to change the mode in the dropdown menu. Use Beats for rhythmic patterns, or Complex Pro for chords and samples with a lot going on. This keeps the quality of the sample and prevents it from getting glitchy:
- Use the Transpose knob to change the pitch of your sample by semitone (st) increments:
How to Find the Pitch of a Sample in Your DAW
I’ve been writing as though you already know the pitch or key of your sample or song. And if you do, that’s awesome. But not all of us are trained musicians—and that’s not a problem!
Your DAW has great tools to help you find the pitch or note of any audio sample.
Here’s how to do it in Ableton Live:


- Find the Tuner and Spectrum (use the Accurate Fast or Notes presets) under Audio Effects. Drop them on the track of your Sample.
- Loop your sample by activating your Loop Switch button and dragging the grey loop strip where you want it:
- Hit play and look at what your Tuner and Spectrum are telling you. Write down the notes you seen in your Tuner. Then Click on the first peak of your Spectrum. This will most likely be your fundamental frequency. An orange square will appear—it tells you what frequency (in Hz) and note you’re working with. Write it down.
- Reach for an online piano keyboard and play those notes at the same time as your sample. Which one sounds right and fits the best? Once you hear it you’ve found your pitch! Congratulations.
If you wanna learn how to find the key of a song by ear, this easy tutorial is pretty awesome. A little ear training never hurt right?
Throw the Pitch Right
The art of sampling doesn’t stop at finding the right sample.
It’s all about what you do with it—pitching, stretching, messing and throwing some effects on it.
The more tools you have in your sampling arsenal, the better you’ll be able to craft a catchy hook, lead line, solo, bassline or pads for your track.
Transposition is one of those key tools—no pun intended.
Gear guides, tips, tutorials, inspiration and more—delivered weekly.
Keep up with the LANDR Blog.


