Subtractive Synthesis: Learn Synthesizer Sound Design
Subtractive synthesis sounds like an abstract scientific concept.
But if you’ve ever used a synthesizer in your music production workflow, chances are you’ve already used it.

Unlimited mastering & distribution, 1200 royalty-free samples, 30+ plugins and more! Get everything LANDR has to offer with LANDR Studio.
That’s because subtractive is the most common synthesis type. It comes from analog synths, but it’s used in tons of synth VSTs and digital hardware synths too.
Understanding subtractive synthesis is hard when you’re just getting started, but it doesn’t have to be intimidating.
In this article I’ll explain everything you need to know to master your subtractive synths and create your perfect patch.
What is subtractive synthesis?
Subtractive synthesis is a method of synthesizing musical timbres by starting with a waveform that contains lots of harmonic content and filtering it down using a filter and other processes.
The rich harmonic waveforms I’m talking about are simple shapes like saw waves and square waves.
These basic waves are easy to produce electronically with an oscillator, but they’re not very interesting on their own.
To make them sound musical you have to shape their dynamics, frequency balance and texture.
That’s where the rest of the processes in subtractive synthesis come in.
Signal flow in a subtractive synth
To understand subtractive synthesis, you need to understand each component in the signal path and how they affect the sound.
You already know that the oscillator produces the rich waveform that acts as a starting point for your patch.
The other components in a typical subtractive synth are the filter, amplifier, envelope generator and LFO.
I’ll go through each one in detail but to help you visualize how a synth works, here’s a diagram that shows how each part is connected:
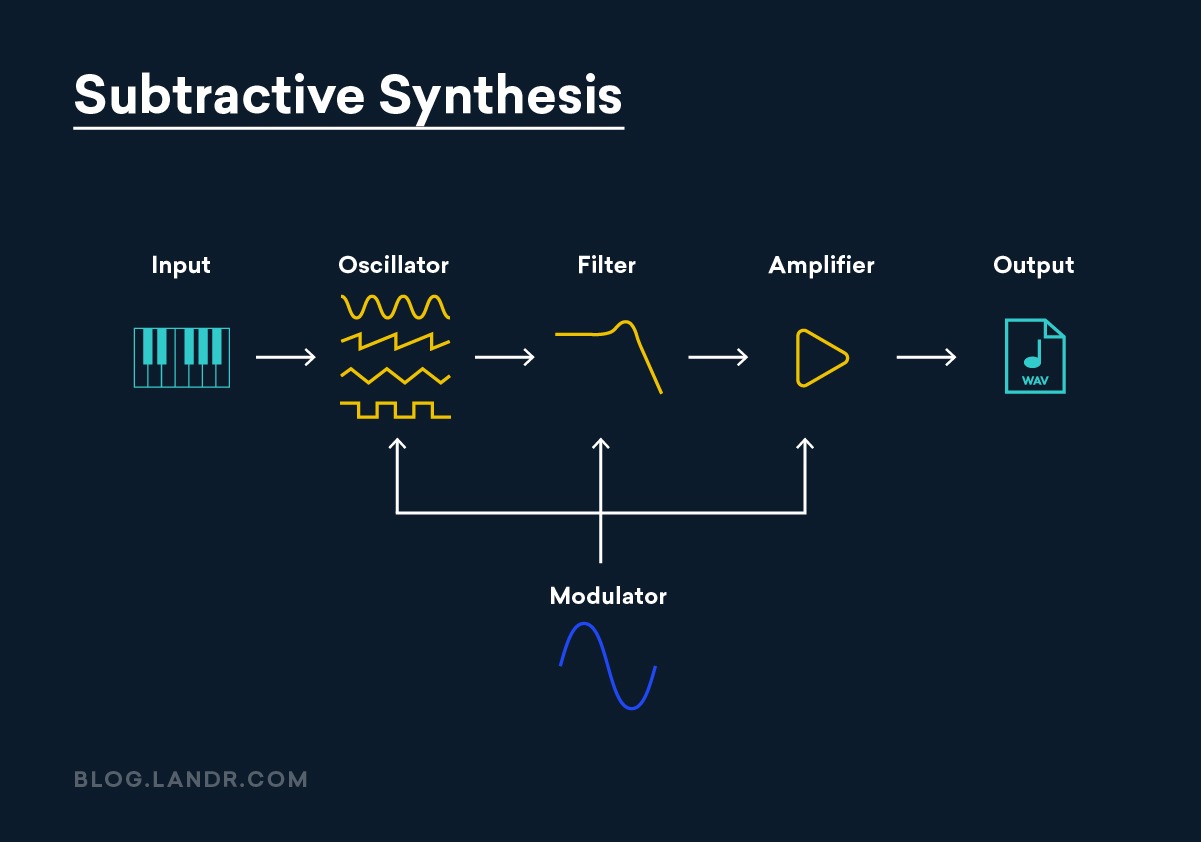
In this diagram, the modulator block could refer to an LFO or envelope generator. I’ll get to those later.
Most subtractive synths are laid out this way, but if you’re familiar with synthesizer history, you’ll know it wasn’t always fixed like this.
In the first synths ever made, each component was a separate module that had to be patched in manually with cables.
In the first synths ever made, each component was a separate module that had to be patched in manually with cables.
This is called modular synthesis. You can still find plenty of die-hard modular synth fans today using the Eurorack format.
Many of today’s modular rigs use the same subtractive architecture as the originals.
Patching individual modules gives you the most flexibility, but synth designers realized that most musicians set up their signal in a similar way each time.
That’s when the first integrated instruments like the Minimoog began to appear. Since then, subtractive synths have had generally the same signal flow.
Let’s look at each part of the signal chain in detail.
Hot tip: SynthMaster 2 from KV331 is an excellent synth for subtractive synthesis, especially with its intuitive workflow and easy-to-use interface. It comes bundled with yearly LANDR Studio subscriptions alongside access to LANDR’s game-changing AI mastering tool, digital distribution, royalty-free samples and more.
Oscillator
Your synth sound starts at the oscillator. Even though it’s only the beginning, the oscillator settings you choose have a big effect on the sound of your finished patch.
Most synth oscillators offer a choice of several different waveforms. The most common ones are:
- Square
- Saw
- Triangle
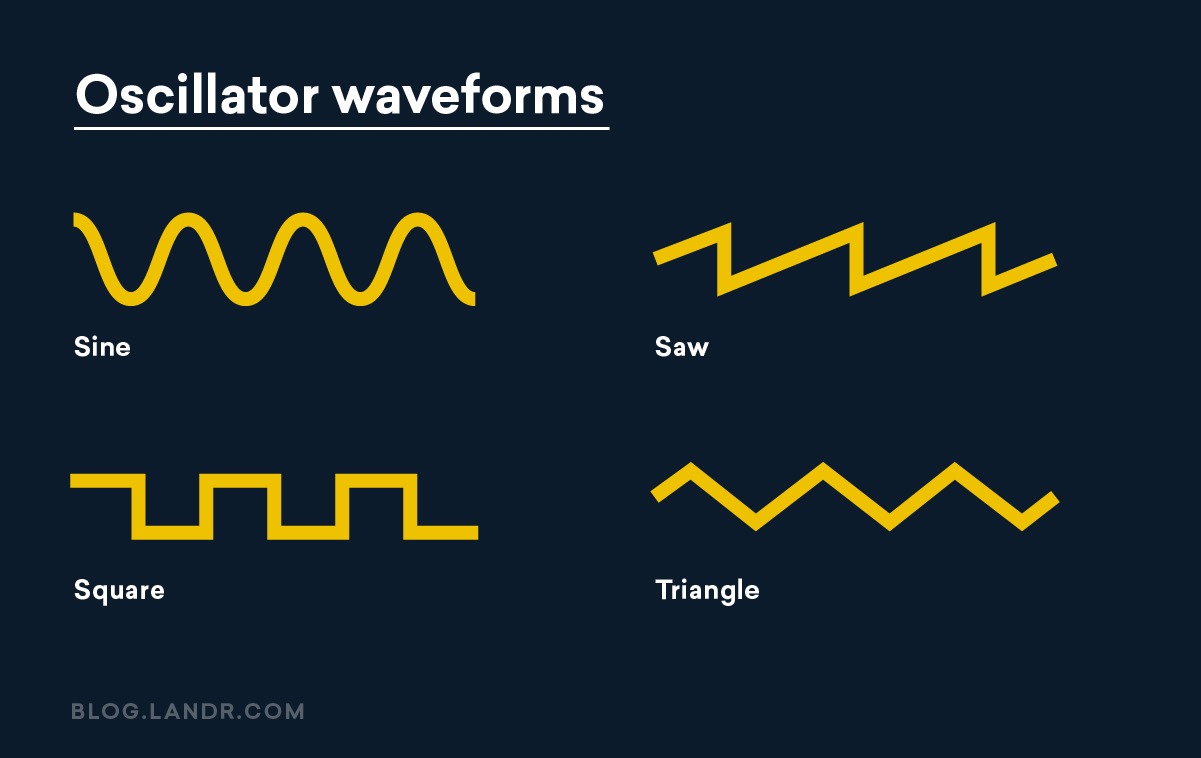
Square has the most harmonic content to start with. That’s why it sounds so buzzy and bright.
A square wave oscillator will retain the most high frequencies after filtering. But square waves have other interesting properties.
Some square wave oscillators have the ability to alter the shape of the square pattern itself. In these oscillators the square shape is called a pulse wave. Setting the pulse width to different values gives different results—more on this later.
Saw has the next most harmonics and a slightly different character. Triangle waves are the most mellow.
Hot tip: Some subtractive synths have a sine wave oscillator, but most don’t since a sine wave is easy to create by applying a low pass filter to a triangle wave—more on this in the next section.
Many subtractive synths have more than one oscillator. You can choose the shape, frequency and detuning amount of each oscillator.
Blending two oscillators of different shapes and frequencies is how you add complexity to your basic waveforms in subtractive synthesis.
Blending two oscillators of different shapes and frequencies is how you add complexity to your basic waveforms in subtractive synthesis.
That’s why the last part of your synth’s oscillator section is usually a mixer. The mixer combines your oscillator signals with any other sound sources your synth might offer.
These other sources could be a sub-oscillator that plays an octave below your main oscillator, an external audio input to the synth or a noise source.
Hot tip: Noise is just another tool for starting off with a complex waveform. Noise can help add presence to the attack of short sounds like plucks and percussion.
Filter
The next step in the signal chain is the filter. This is where the “subtracting” really takes place.
Many synths offer multimode filters, but the most common filter type in a subtractive synth is a low pass filter.
The low pass filter is named for the frequencies it allows through—meaning that an LPF is actually a high cut.
Filtering out these high frequencies dramatically changes the sound. Each frequency position of the low pass filter reveals a different harmonic character in the original oscillator.
Each frequency position of the low pass filter reveals a different harmonic character in the original oscillator.
That’s why subtractive synthesis is so powerful!
The filter’s resonance control creates a “bump” right around the cutoff frequencies that you can use to sculpt the sound even more.
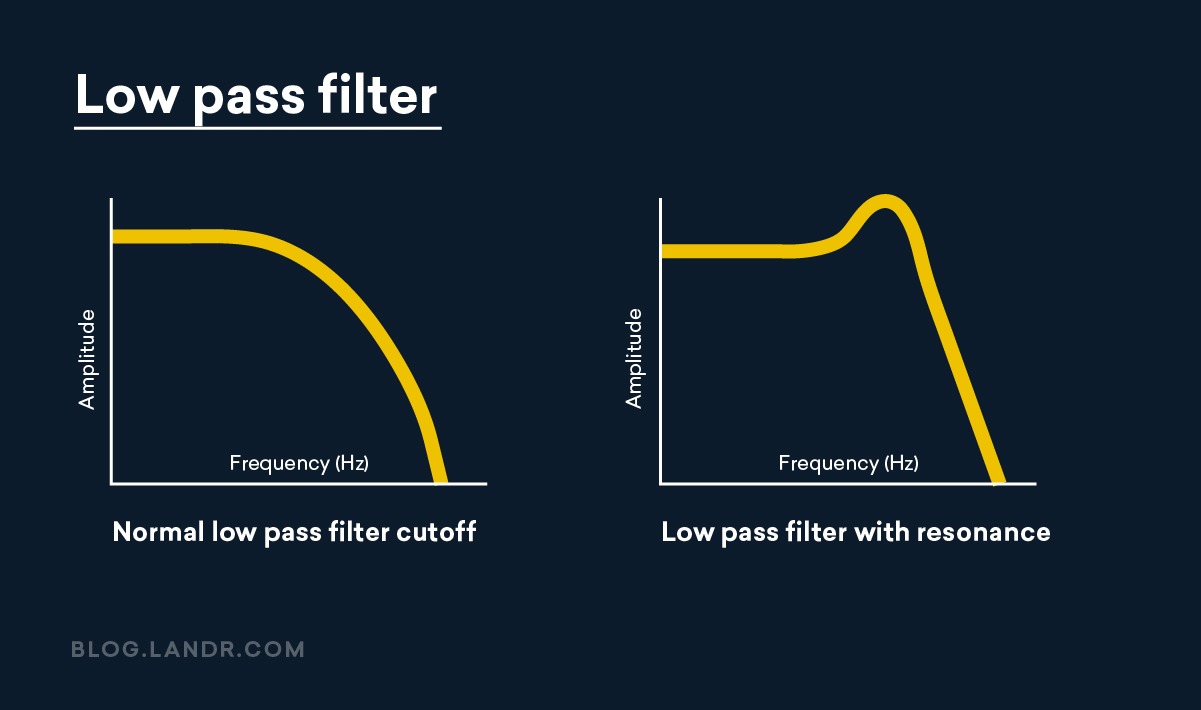
Play around with your filter’s cutoff frequency and resonance to get an idea of how they affect the sound. You’ll probably hear how these parameters create many of the most recognizable sounds in synthesis.
As I mentioned above, your filter might have some additional modes other than low pass. These let you select the frequency range that gets cut from the original rich signal.
High pass is the opposite of low pass, and cuts the lowest frequencies from your signal. Band pass cuts everything except a narrow band around the center frequency.
The last basic parameter your filter could include is a “poles” switch. This is sometimes written as “2-pole/4-pole” or “12 dB/octave or 24 dB/octave.”
This parameter controls the slope of the filter and affects how dramatically it will attenuate material above the cutoff frequency.
12 dB/octave or 2-pole is gentler while 24 dB/octave is a steep drop off below the cutoff frequency.
There’s a lot more beyond the basics when it comes to filters but for now I’ll move on to the next link in the chain.
Amplifier
The next component in a subtractive synth is the amplifier. This is the part that brings the signal up to a level that’s strong enough to connect to other gear like a mixer or audio interface.
An amplifier on its own isn’t that exciting, it’s what controls it that gives you so much sound design capability.
I’m talking about the envelope generators. Let’s dive right into it.
Envelope generators
Envelope generators are one of the ways that you create change over time in your subtractive synth patch.
They’re absolutely essential to crafting compelling sounds with subtractive synthesis.
Many synths contain a few of them, but the most common configuration is one EG that acts on the amplifier and another that acts on the filter.
I’ll start with the amplifier since it’s the easiest to understand.
When an envelope generator acts on synth’s amplifier, it changes the overall volume of the sound according to the shape of the envelope.
When an envelope generator acts on synth’s amplifier, it changes the overall volume of the sound according to the shape of the envelope.
As soon as you press a key on your synth, its EG starts a cycle that goes through four phases: attack, decay, sustain and release.
These are commonly shortened to ADSR.
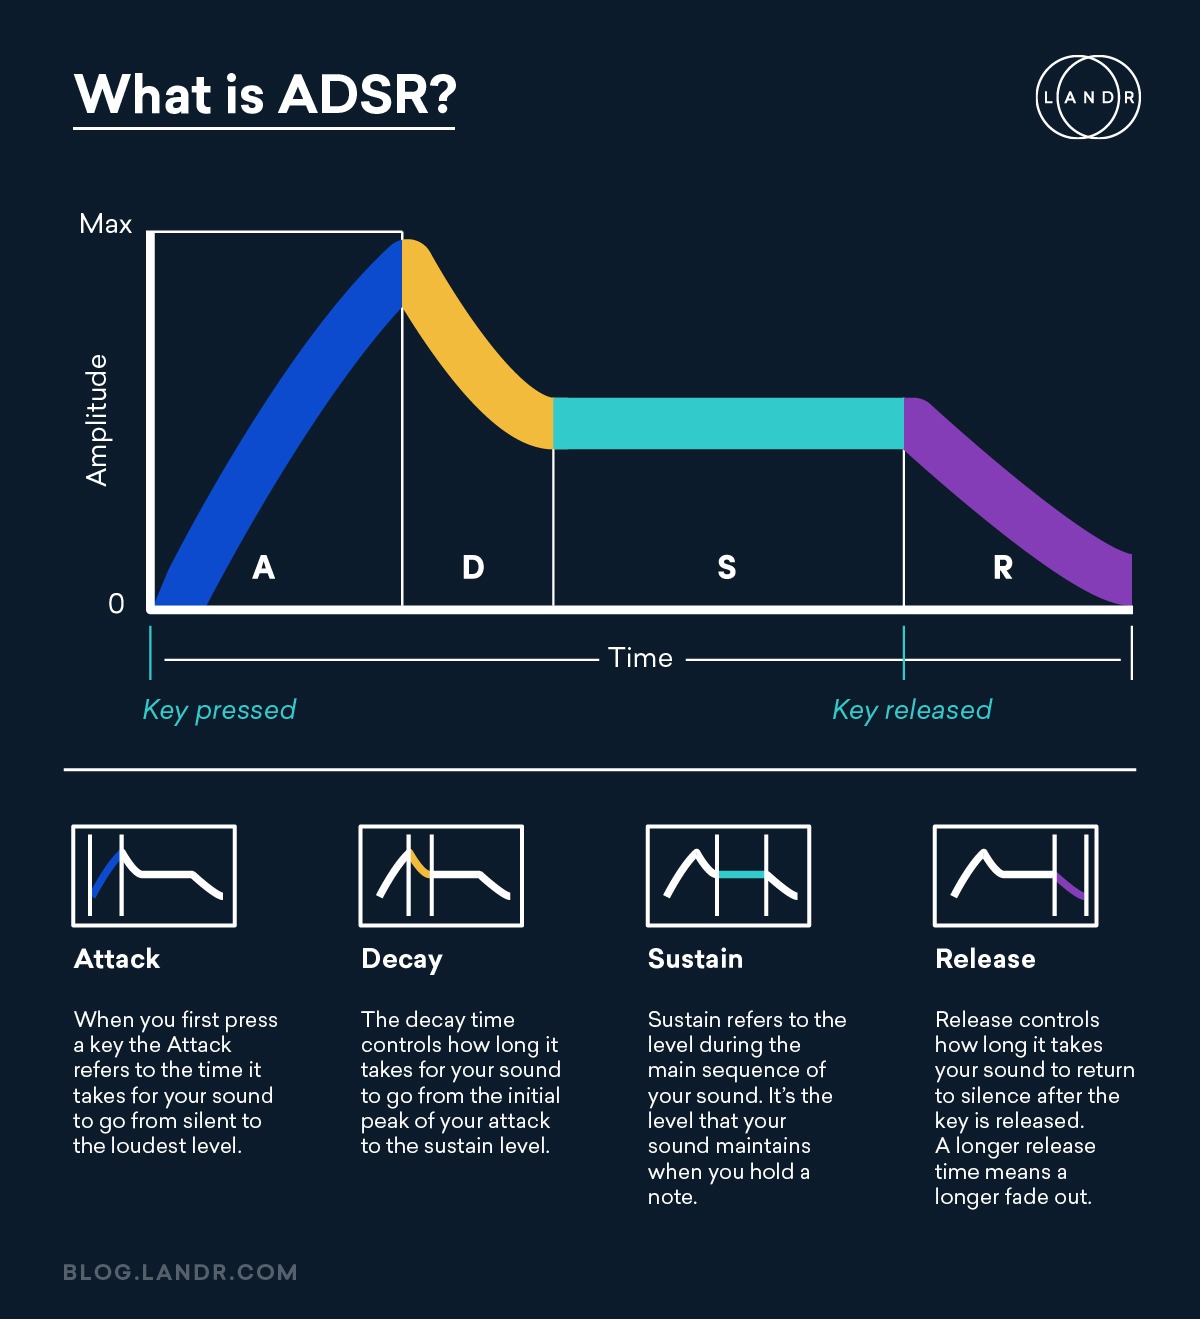
I’ll go through each one in detail and explain how it affects your sound when connected your synth’s amplifier:
Attack
Attack controls the first moments of your synth sound’s volume. It determines whether it has a punchy, abrupt onset on a more gradual fade in.
The attack control is measured in units of time, usually milliseconds. It controls how long it takes for a sound to reach its maximum intensity
Use the minimum attack time for sharp sounds and longer settings for ambient pads:
Decay
Decay controls how long it takes for your sound to settle at the level it will continue at until you take your finger off the key.
It’s also measured in time. Short decay times create a more dramatic drop off in volume from the peak.
This is how you create highly dynamic sounds like plucks or snares.
Sustain
Sustain controls the overall level your sound will play at once the attack and decay phases are over.
It’s measured in dB. Lower sustain values will make the difference between the start of the sound and its “body” more dramatic.
Release
Release controls the time it takes for your sound to drop off from its level during the sustain stage to silence.
Longer release times will give notes a trailing, ambient tail, where short release times will cut notes off just after you release the keys.
Filter envelopes
I just described the effect of an envelope on a synth’s amplifier. But envelopes can act on any other parameter—just like an LFO.
You’ll often see them on filters, where they control the animation of the cutoff frequency over time.
The ADSR parameters work the same way, but their effect on the sound is entirely different.
Try experimenting with your filter’s envelope to see how the different controls add character to your synth sound.
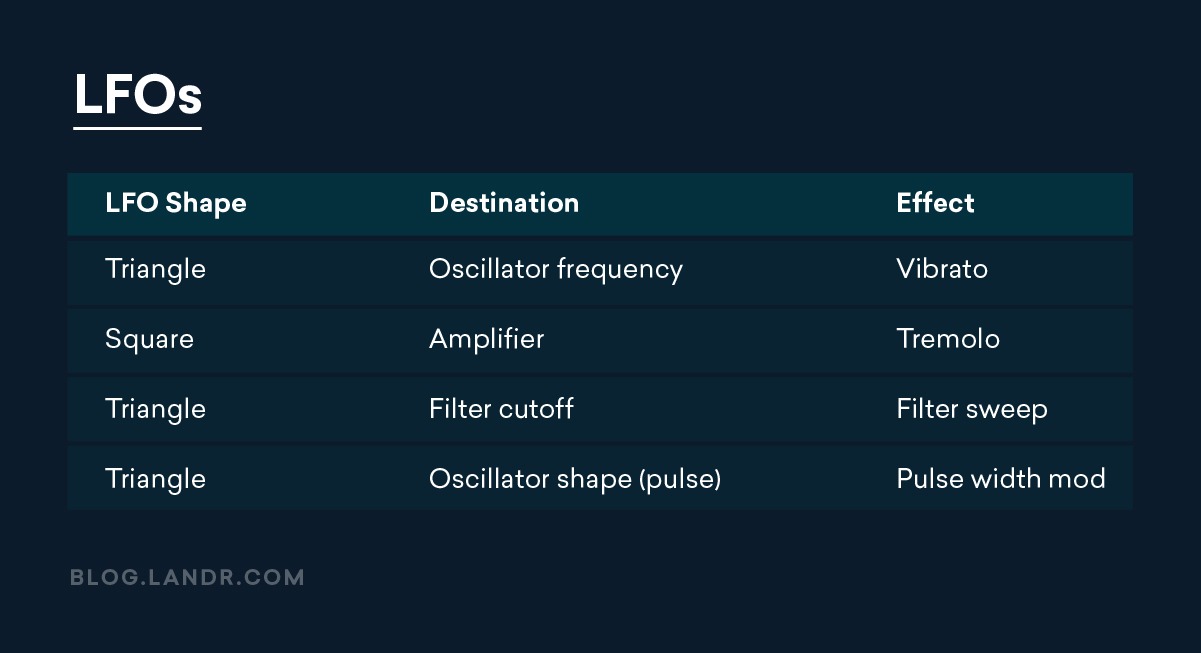
LFO
The last key piece of the subtractive signal chain are the LFOs.
LFO stands for low frequency oscillator. They’re similar to regular oscillators—with a twist.
These oscillators have shapes just like the ones in your main signal generators. But they operate at a much lower frequency—so low that you wouldn’t necessarily hear it as a musical tone if you directly listened to their output.
Unlimited mastering & distribution, 1200 royalty-free samples, 30+ plugins and more! Get everything LANDR has to offer with LANDR Studio.
Instead, LFOs create repeating modulation in your synth sound.
Imagine you had a third hand to turn a knob on your synth back and forth at exactly the same rate each time—that’s LFO modulation!
You can connect LFOs to so many different parameters in your synth. To help you get an idea of the outcomes of an LFO here are some common routing options that produce well known effects:
Putting it all together
All these elements might seem overwhelming, but building sounds with subtractive synthesis is fun and intuitive.
Choose the starting sound with the oscillator, shape its frequency balance with the filter, animate it with LFOs and sculpt its envelopes with ADSR.
To make it easier, let’s review the basics in the order you’d set them to build a sound:
Choose the starting sound with the oscillator, shape its frequency balance with the filter, animate it with LFOs and sculpt its envelopes with ADSR.
That’s all there is to it!
Once you get used to this signal processing flow you’ll start dialling in great synth tones in no time.
Now that you have the basics down, get back to your DAW and start making patches.

Michael Hahn is an engineer and producer at Autoland and member of the swirling indie rock trio Slight.
@Michael HahnGear guides, tips, tutorials, inspiration and more—delivered weekly.
Keep up with the LANDR Blog.