Sample Rate and Bit Depth: How File Quality Affects Your Sound

Whenever you start a session in your digital audio workstation (DAW) you’ll have to decide on the sample rate and bit depth.
Both are important choices that will affect the quality of the audio tracks you capture when you record sound with your interface and work with audio in your DAW.
But if you’re just getting started with music production, these concepts might seem hard to grasp.
Even so, there’s nothing complicated about sample rate and bit depth once you understand what they are and how they impact your work.
In this article I’ll go through everything you need to know to get the right sample rate and bit depth right every time.
What is sample rate in audio?
Sample rate, or sampling rate, in audio, is the number of digital snapshots taken per second in an audio file by an analog-to-digital-converter (ADC) like the one in your audio interface.
Sample rate, or sampling rate is the number of digital snapshots taken per second in an audio file by an analog-to-digital-converter like the one in your audio interface.
If that sounds complicated, I’ll break it down to basics.
An analog signal like one that comes from a microphone or instrument is a continuous waveform. It takes the form of a changing electrical voltage that represents the sound wave itself.
To store it as a digital file your ADC takes thousands of individual measurements of the signal—enough to perfectly reconstruct it when it’s time to play it back.
Sampling rate is the exact number of measurements taken in one second. It’s measured in Hertz so it can be expressed as a frequency.
A higher sample rate means you’re taking more snapshots per second, and results in a higher-quality audio file.
What sampling rate should I use?
In general, the higher you set the sample rate and bit depth, the greater the quality of audio information.
Even so, super high sample rates like 96 kHz or greater increase the size of your audio files a lot. Despite the extra size, you may not hear a big difference in audio quality.
Many tutorials will tell you that the standard sample rate for recording music is 44.1 kHz. I recommend 48 kHz for most producers, which creates a good balance between quality and file size.
If you’re wondering how to improve the audio quality of a recording, it can be worth it to play around with higher sample rates. If it sounds better to you and your music production computer can handle it—go for it!
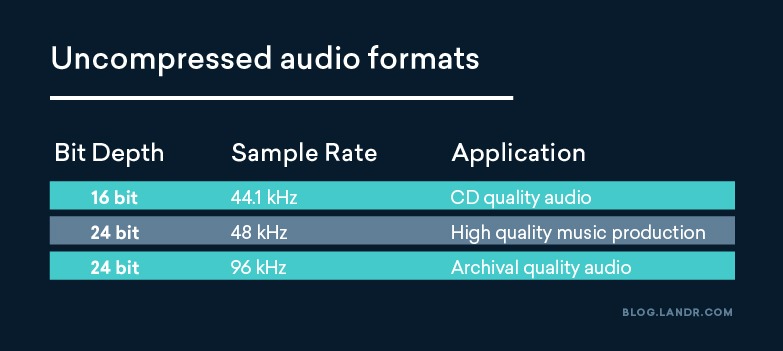
Here are some common sampling rates in audio production you might have seen before:
What is audio bit depth?
Bit depth is the precision of the measurements taken with each snapshot. Sample rate and bit depth are closely related and often discussed together.
Bit depth is the precision of the measurements taken with each snapshot.
Think of the analog signal from a microphone coming into an audio interface. The analog-to-digital converter has to measure it 48,000 times if your sample rate is set to 48 kHz.
The bit depth defines the number of tick marks on the ruler used to measure the level of the incoming signal.
The more places to mark the level, the more precise the number will be!
These days the most common audio bit depth options you’ll see are 16- and 24-bit. I recommend recording at 24 bit along with your 48-kHz sample rate. 32-bit options are also available in some situations.
🧠 Hot tip
How do you change sample rate and bit depth?
Most DAWs let you change sample rate and bit depth in your audio preferences. Some can even pick and set the optimal sampling rate for you. You should choose these settings before you start recording, and maintain your high-quality audio file type all through production until the end of the mastering process.
Changing the sample rate and bit depth of your audio material after the fact has some consequences you should try to avoid.
Today’s DAWs and audio interfaces mainly offer settings for CD quality and above. Since there aren’t many restrictions on storage or processing these days, there’s no reason not to start off with a high-quality audio file type.
Getting it right at the start is important. But if you’ve been following along so far, you won’t have much to worry about at 24 bit, 48 kHz.
Still, if you need to change the sample rate, you can. Here’s how to do it.
But, if working at a higher sample rate sounds better to you and your music production computer can handle it—go for it!
Downsampling
When done properly, there’s nothing wrong with downsampling, but it’s better to keep the full resolution of your production format until it’s time to deliver finished files.
Moving from a high sample rate to a low sample rate is called downsampling
When you downsample, some information is removed from the file in order for it to fit in the smaller format. It will represent the waveform with fewer samples and shorten the word length by rounding or truncating. Once that data gets thrown away, it’s gone forever—that’s why it’s best to avoid downsampling until the last step.
Despite that, downsampling might be necessary to get to the final format needed for your release. This often happens when a release comes out on CD, which requires 16-bit 44.1-kHz audio.
When done properly, there’s nothing wrong with downsampling, but it’s better to keep the full resolution of your production format until it’s time to deliver finished files.
🧠 Hot tip
Upsampling
Upsampling means moving from a lower sample rate to a higher sample rate. Unfortunately, there’s no way to add back information that wasn’t there in the first place. To upsample, you need to insert new samples between the existing ones.
There are some digital processes that can make it possible to represent audio information at a higher sample rate, but there’s little benefit, as it won’t result in a higher quality file.
That’s why, while upsampling is sometimes used to create high-quality audio files, it’s more often used outside the audio world, for example, in image processing.
In fact, don’t bother upsampling your audio files unless absolutely necessary.
Sample and hold
Sample rate and bit depth are two keys to how to improve the audio quality of a recording.
What might seem like a simple preference in your project settings is actually a fundamental quality of the files you work with.
It’s important to understand how to change the sample rate and bit depth. But that’s not all you need to know about audio editing.
There’s so much you can do with your audio files, and this is just the beginning. If you’re ready to dive in, join the LANDR community for exclusive access to plugins, tips and tutorials.
Gear guides, tips, tutorials, inspiration and more—delivered weekly.
Keep up with the LANDR Blog.
