


Vital Synth: How to Use It and Where to Begin

The Vital synth is one of our favorite free plugins, and learning how to use it is easier than you might think.
If you’re not familiar with it, Vital is referred to by its developers as a “spectral morphing wavetable synth” plugin.
Learning a new synth plugin can be intimidating, so we’ll walk you through some of the key features to help you get a smooth start.
But before we dive into Vital itself, we’re going to start with a quick refresher on wavetables.
What are wavetables?
Wavetables are a unique way of implementing more dynamic waveforms in the oscillators of a synthesizer. Instead of providing separated analog-style waveforms, a wavetable provides a connected sequence of waveforms that can be “scanned” to change the harmonic character of the oscillator in real time.
When the wavetable position is modulated with an LFO, for example, it can add a distinctive sense of movement and variety to a synth patch.
The Vital synth provides different amounts of wavetables depending on which pricing tier you choose, but we’ll be using the free version, which comes with 25 wavetables.
To help you make the most of this excellent synth, let’s run through some of its most important features and how to use them.
Oscillators overview
The Vital synth provides three waveform-based oscillators and one sample-based oscillator.
Some aspects of this section are pretty self-explanatory, but let’s focus on a few that are worth breaking down.
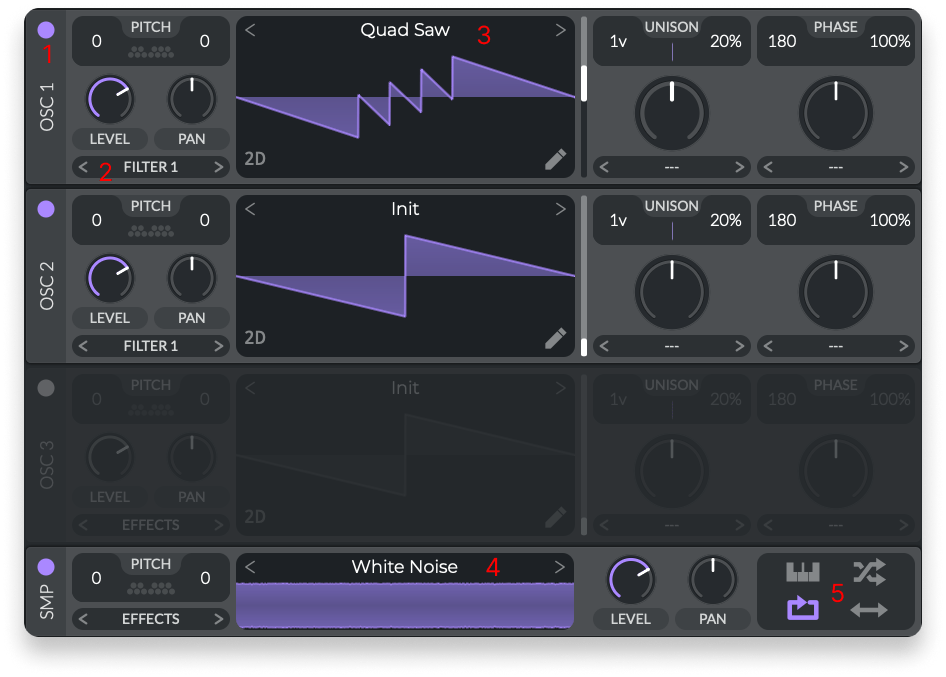
The oscillator section
- Button for activating or deactivating each oscillator module
- Selector for choosing where the sound from the oscillator will be routed
- Selector for the waveform or wavetable you’d like to use
- Selector for the sample that is loaded into the sample oscillator module
- Buttons for choosing the playback behavior of the sample oscillator
The routing selector (labeled 2) is especially handy when you only want an oscillator to go through one of Vital’s filters instead of both, or neither of them and straight to the effects or output.
Experimenting with different samples provided in the sample oscillator can add some particularly unique textures to your patches.
The playback selector for the sample oscillator (labeled 5) allows you to activate or deactivate keyboard pitch tracking, shuffle mode, endless loop mode, or back-and-forth loop mode.
We find shuffle mode especially interesting, as it sets the playback position to a random part of the sample with each note.
Wavetables & waveshaping
Let’s take a closer look at the wavetable and waveshaping aspects of the Vital synth.
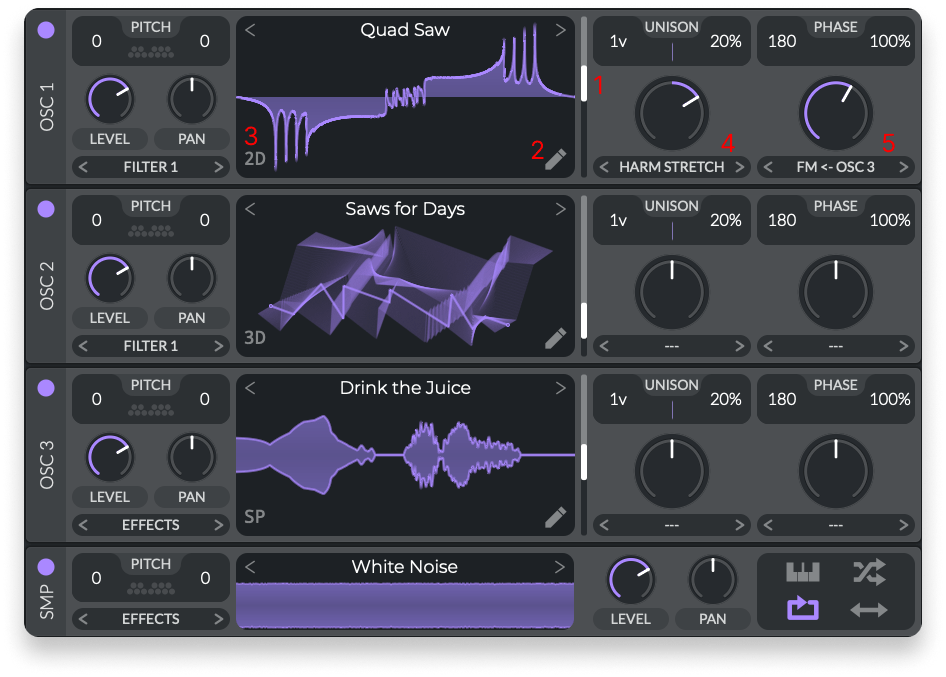
The wavetable and waveshaping parameters
- Scroll bar for scanning through the wavetable
- Button to open the wavetable editor window
- Button to toggle between different display modes for the waveform or wavetable
- Selector and knob for applying waveshaping effects to your waveform or wavetable
- Selector and knob for applying additional waveshaping effects and configuring cross-modulation like FM and ring modulation
The oscillator display modes (labeled 3) don’t affect the sound, they simply display the harmonic information in different ways depending on your preference.
Things really start to get interesting when you experiment with the waveshaping effects and cross-modulation (labeled 4 and 5).
In fact, an oscillator can even receive frequency modulation or ring modulation from the sample oscillator, which can make for some pretty wild sounds.
Finally, the wavetable editor (labeled 2) allows you to edit the provided wavetables and create your own.
Wavetable editing is perhaps the deepest and most technical aspect of Vital, so we’d recommend learning the basics of the synth before diving deep in this area.
If you do want to learn the wavetable editor, we recommend this video and this video.
Load your own samples & wavetables
One particularly interesting way to experiment with the oscillators is to load your own audio files.
When it comes to the sample oscillator, you can do this simply by dragging an .mp3 or .wav file into the sample oscillator display:
You can also load your own audio file to one of the main oscillators:
When you do this, three options appear that determine how the file will be processed — wavetable, vocode, and pitch splice. Drop your file onto one of these options and it will be loaded into the oscillator.
This is different from loading files to the sample oscillator, as it treats your file as a waveform or wavetable instead of a standard sample.
The conventional use for this would be to load wavetable files or single-cycle waveforms sourced from online.
But we find it especially interesting to load all kinds of different one-shot samples and experiment with the settings.
Find some samples to load into one of the main oscillators, drag the wavetable scan slider, and apply waveshaping effects to see what kinds of wild sounds it can deliver.
Text-to-wavetable
One of the most interesting features of the Vital synth is text to wavetable.
This provides you with a text box for entering a word or short phrase. Vital will then create a wavetable that sounds like it.
First, you’ll need to open the “Text to Wavetable Template” preset found in the “Templates” section. Here’s how to do it:
The result is a bit like the sound of a vocoder, and you can manipulate its pitch or timbre using the first waveshaping effect parameter of the oscillator.
We love using this feature to get interesting formant-style sounds that can be processed with the rest of Vital’s signal path.
One downside to the free version of Vital is that you’re limited to 5 text-to-wavetable prompts per day. The pro version allows for unlimited text-to-wavetable prompts.
Filters
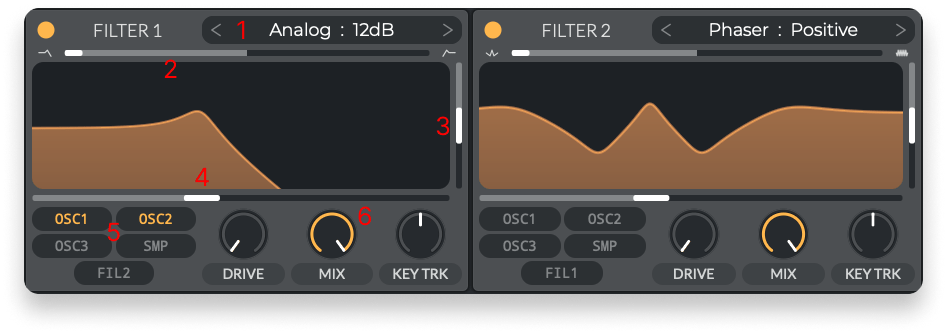
The Vital synth features two filters, and they offer a wide range of modes to choose from. Let’s get familiar with the filter parameters.
The filter section
- Selector for the filter type
- Scroll bar for morphing between filter contours
- Scroll bar for the filter resonance
- Scroll bar for the filter cutoff
- Selector for the input signal that the filter is receiving
- Knob for mixing the pre-filter and post-filter signals (like a dry/wet knob)
The filter types range from classic analog-style models to more unique ones like formant filters, comb filters, and phasers.
The filter contour scroll bar (labeled 2) allows you to morph between filter modes or shapes.
Analog 12dB, for example, will morph between low-pass and high-pass, while the phaser filter will morph to create additional peaks.
When selecting the filter input (labeled 5), this will automatically change the corresponding routing selector in the oscillator section, making them essentially the same parameter.
We recommend experimenting with different filter combinations to tame or enhance the harmonics of your oscillators.
Envelopes & modulation
The Vital synth offers three envelopes, four LFOs, and two main sources of randomness.
Here’s a run-through of the most distinctive features in this area:
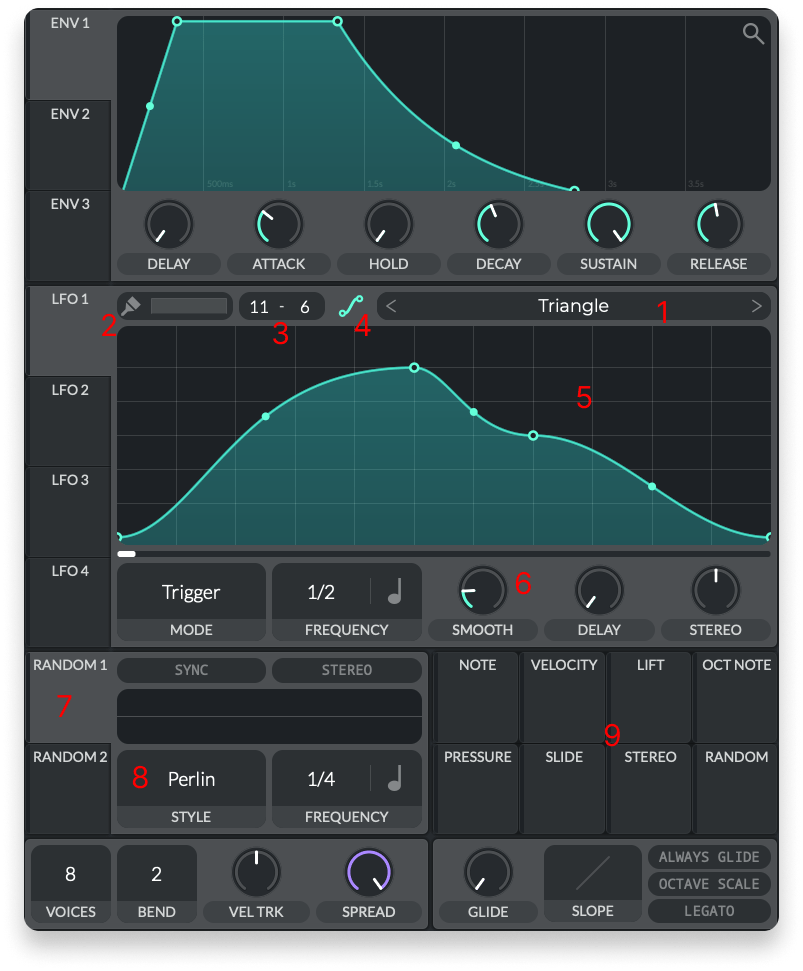
The envelope and modulation source section
- Selector for the LFO waveform
- Activation and selector for the brush tool
- Parameters for setting the number of horizontal and vertical divisions of the LFO grid
- Button for toggling between curves and straight lines in your LFO shapes
- The LFO grid, with draggable points throughout the LFO shape
- Knob for smoothing the repetition of the LFO
- Sources of random modulation
- Selector for randomness algorithms
- Additional sources of modulation
You can draw LFO curves using the brush tool (labeled 2), create points along the curves by double-clicking them, and manipulate the points within a grid by dragging them.
The horizontal and vertical grid division values (labeled 3) determine the resolution of the grid that your LFO will be structured by.
The smooth knob allows you to crossfade the end of the LFO cycle into its beginning, making for smoother repetitions.
The additional sources of modulation (labeled 9) are mostly related to keyboard expression and MPE values, while some simply add an extra touch of dynamic animation to patches.
The random source here, for example, will add an extra bit of randomness to the destination parameter on each note triggered.
Modulation routing & matrix
The Vital synth offers two ways to create and route modulation. We’ll start with the modulation matrix.
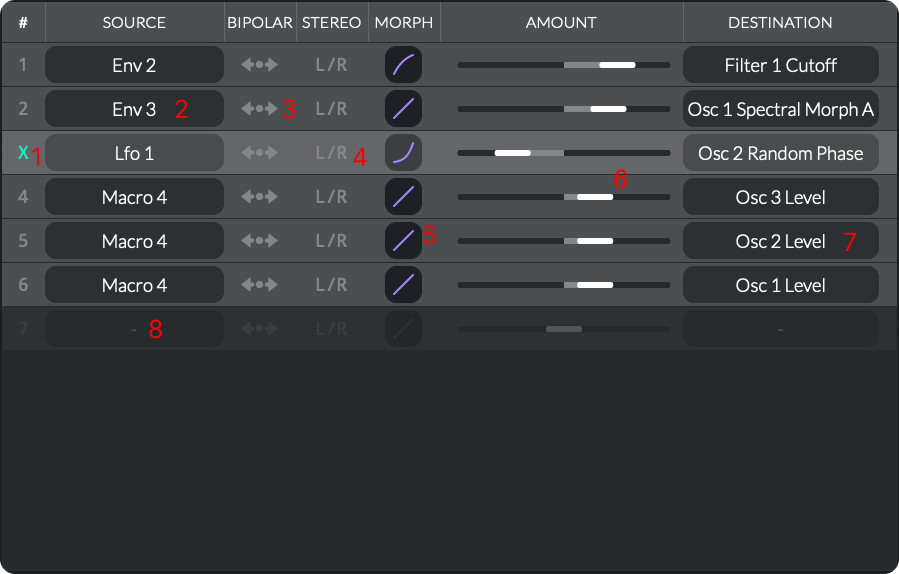
The modulation matrix
- Modulation routing number and bypass button
- Selector for modulation source
- Button for bipolar or unipolar modulation
- Button for stereo or mono modulation
- Control for modulation morphing
- Slider for modulation amount (right for positive, left for negative)
- Selector for modulation destination
- Empty modulation slot
To create a new modulation routing in the matrix, simply click on the selector for the modulation source and destination (labeled 2 and 7) and make your selections.
Dragging the amount slider (labeled 6) will introduce that modulation to the destination parameter. You also have several ways to modify your modulation.
For example, clicking and dragging the morph curve (labeled 5) will change the rate at which the modulation is introduced to the source.
With the stereo button (labeled 4), you can apply positive modulation in the right channel and negative modulation in the left. This can create interesting stereo movement in your patches.
It’s also very easy to see your modulation routings in the interface of Vital and quickly disconnect them if you wish.
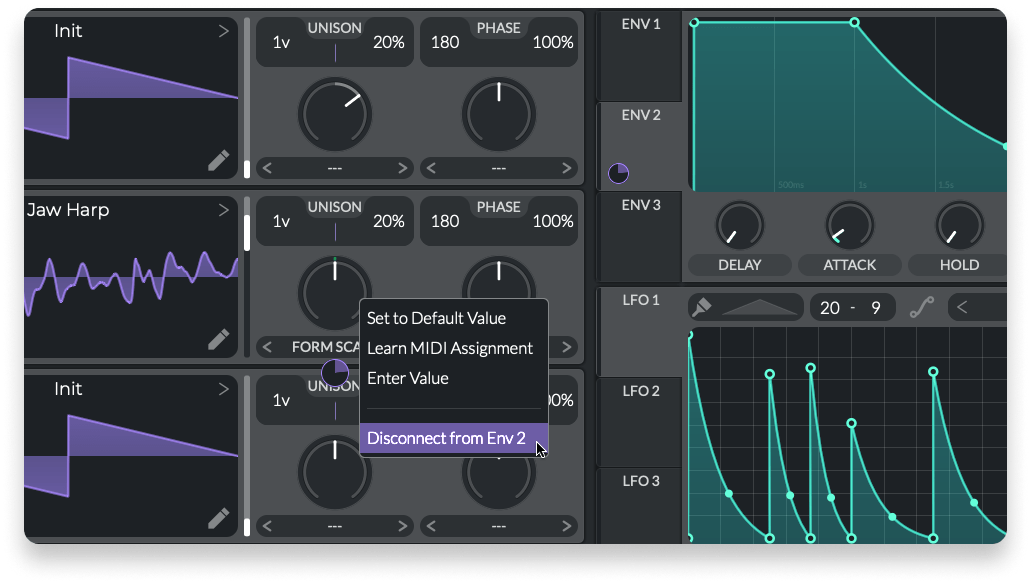
The small purple dials indicate modulation amounts at the destination and source
The small colored dials appearing at the source and destination will indicate the modulation amounts, and you can click and drag these to change the amounts as desired.
To disconnect a modulation routing, simply right/CTRL-click the source or destination to reveal the disconnect option.
If you want to set up modulation quickly without switching to the matrix, you can click and drag from any source to any destination:
We love this for setting up quick modulation in our patches. While we generally prefer it over the modulation matrix, the matrix is still ideal for keeping track of all the modulation in your patch.
And finally, if you want to control multiple parameters with one knob, you can use the macros feature, which essentially works the same as the other modulation sources:
Modulation remap
Modulation remap offers a unique and powerful way to further process and modify modulation signals.
Each modulation source you create in your patch will have a modulation remap curve, which appears in the modulation remap section below the matrix.
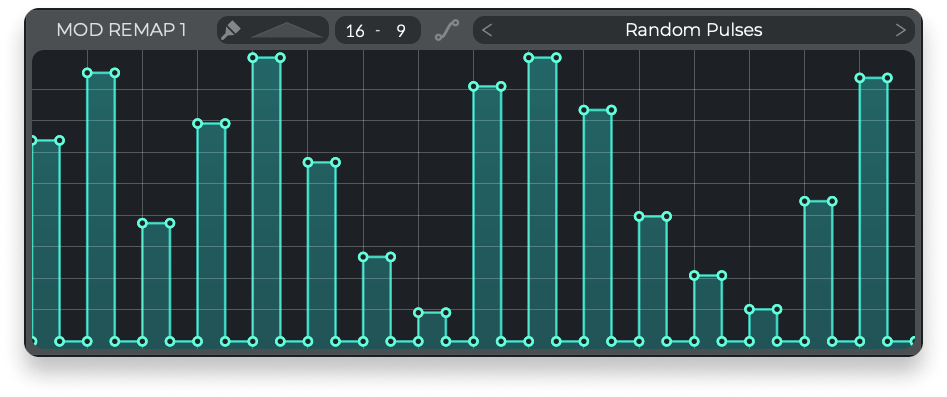
The modulation remap section
As you can probably tell, you can set select your mod remap shape and draw or manipulate curves just like you would with an LFO.
By default, the mod remap for a given modulation source does not change the incoming modulation signal. If you shape the remap curve, then the modulation signal changes.
This a pretty advanced feature compared to the others, and we can’t fit an extensive exploration of it into this guide. We recommend checking out this video for a deep dive.
Still, you can certainly experiment with it to understand the fundamentals of how it works.
Choose a modulation routing you’ve set up in the mod matrix, create unique remap curves, and see what happens.
You can also look at any mod remaps that are used within Vital’s factory presets to get a sense of what they can do.
A vital synth for the studio
There’s so much more to Vital — from its easy-to-use effects section to the countless possibilities with modulation and mod remaps — but we hope we’ve given you a solid starting point for getting comfortable with it.
Like a lot of great music-making tools, Vital has a strong community of devoted users who come up with all kinds of interesting tips and strategies.
We recommend checking out the Vital synth Discord server if you’re especially keen to master this plugin.
Happy synthing!

Devon Hansen is a producer, DJ, and writer with 20 years of experience in electronic music production. Having worked under various names and in a wide range of styles, Devon has performed several editions of MUTEK Montreal and has released music with labels in North America, the UK, and Japan. When not working on creative projects or playing tunes on Montreal’s n10.as radio, Devon can be found watching movies, cooking, and reading too much about gear.
@Devon HansenGear guides, tips, tutorials, inspiration and more—delivered weekly.
Keep up with the LANDR Blog.