
How To Mix Kick and Bass: Sidechain Compression Mix Tips
I recently had a major mixing revelation.
No matter what I tried I couldn’t get my kick to stand out in the mix. The kick and bass sounded great on their own.
But music mixing was new to me. So when I’d play them together they’d sound flat and lifeless.
Until I did one simple thing that made everything sound perfect.
It’s actually really easy. Here’s how I did it.
The First Step Towards That Punchy Kick
First of all, I realized that my kick and my bass were fighting for space in the frequency range—the highs, mediums, and lows. This is no good.
Bass and kick tend to share a lot of the same frequencies in the low end. If they stay like this in your mix, they’ll mask each other. So how do you fix it?
Setting Up For Success
In order to make your kick cut through your mix you need to use compression in a specific way…
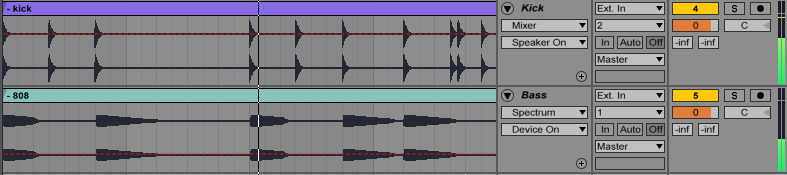
Put your Kick and Bass into separate tracks. I used Ableton for this example, but the principles are the same in any DAW. Set up your tracks like this:
Here are the loops sounding great on their own:
The Kick
Here's the kick part.
The Bass
Here's the bass part.
When Your Bass And Kick Are Fighting
And here’s how they sound together:
They clash when played together.
They’re sounding a bit sad and limp. Let’s make that kick shine.
How to Get Clear Kicks That Don’t Clash With the Bass
Just use sidechaining.
It’s a type of compression that temporarily reduces the volume of one signal to let another one through.
In this example the bass is being set aside for a second to let the kick through.
So now that you know what the shortcut is, you probably wanna know how to do it. But first you need to set up some compression.
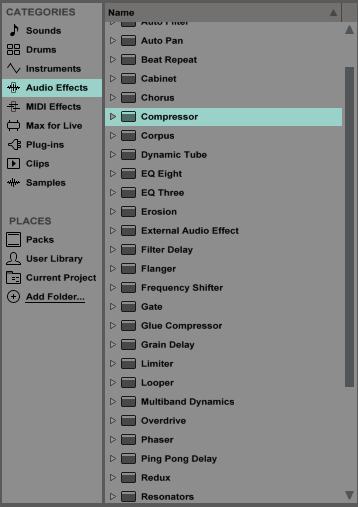
1. Go to the ‘Audio Effects’ folder and select ‘Compressor’
Most DAWs come with a compressor plugin that can be set up as a sidechain style compressor.
For this tutorial, we’ll show you how to set up the compressor included in Ableton Live.
Find the compressor tool in your DAW and drag it to the audio effects inserts section of your bass track.
We want the kicks to shine through, so we’ll use a compressor to reduce the volume of the bass, making room for the kicks to sound out when they’re played.
2. Click the black triangle at the top left of the compressor plug-in
Compressor’s wont always default to a sidechain setting, so you’ll need to find the side chain option and route the audio input signal that’ll be used to trigger the compressor’s noise reduction.

3. Click the ‘Sidechain’ button
In Ableton’s stock compressor, you simply have to select the “Sidechain” option.
But in other plugins you may have to find its own unique sidechain setting.
4. Click the ‘Audio From’ tab and set it to ‘Kick’
In this case, we’ve routed audio from the kick track to the sidechain, that means every time the kick is played it will trigger the compressor to reduce the volume of the bass track.
Boom, you’ve just successfully set up your sidechain. How easy was that?
Experimenting To Get Your Perfect Sound

Now it’s time to experiment with the settings to get the ducking effect you want. Ducking just means how the bass will be lowered to let the kick through.
Play with the release time to make it fit the tempo and groove of the track. Adjust the threshold to make the noise reduction effect more or less sensitive to the volume of the kicks.
The Finished Sound
Now that your kick has more than enough room to do it’s thing. Listen again to the track. You’ll hear your bass letting the kick through. Nice, crisp and punchy:
The sidechain can seem a little subtle. Here’s a constant tone to show you what the sidechain is doing:
Listen to how the constant bass tone ducks in volume every time a kick is played.
In The Mix
Your loops are finally getting along together. But sidechaining isn’t just for kick and bass. Try it on other parts of your mix as well.
No matter what you try, sidechaining allows you to finish your project with your kick and bass in the perfect place.

Rory Seydel is a musician, writer and father who takes pleasure in touring the world and making records. Creative Director at LANDR.
@Rory SeydelGear guides, tips, tutorials, inspiration and more—delivered weekly.
Keep up with the LANDR Blog.