EQ Cheat Sheet: How to Use An Instrument Frequency Chart [Infographic]
![EQ Cheat Sheet: How to Use An Instrument Frequency Chart [Infographic]](https://blog-api.landr.com/wp-content/uploads/2016/12/How_To_Use_Instrument_Frequency_Chart_1200x627-1.jpg)
It’s EQ month! We’re gonna dig in on all things EQ in the coming days. This article is the second part of the series.
So if you haven’t read it yet, check out our EQ Primer: What Is EQ before you jump in on this EQ cheat sheet. Ok, all set? Enjoy!
How to EQ: Super Freqs
Knowing how to use an EQ to equalize audio is an essential skill for mixing music right.
Doing it well all comes down to knowing your frequencies and how they interact in your track.
Audio frequencies aren’t difficult to tame as long as you know what they’re up to. The first step to knowing how to EQ is understanding where all your instruments fit on the frequency spectrum.
That’s why we created this EQ cheat sheet for all your EQing needs.
Seeing where each instrument fits on the frequency spectrum will help you identify which instruments and frequencies might be fighting each other in your mix, and will help you get the best possible mix before that final mastering step.
Theory guides, production tips, new free plugins, gear guides and more—delivered weekly
Keep up with the LANDR Blog.
Choose Your Instruments Wisely
EQ is a valuable tool. But it can only do so much.
If you choose a ton of instruments that are all fighting for space in the same frequency range, you’ll have to stretch your EQ pretty far to fit them all in and keep it natural.
So you have to choose your instruments wisely and always aim for the best possible recording. EQ is something you apply to your mix, not add to it.
Keep that in mind when you’re recording and get the best possible mix before you do any processing.
EQing can’t make a bad recording good. But EQing CAN make a good recording GREAT.
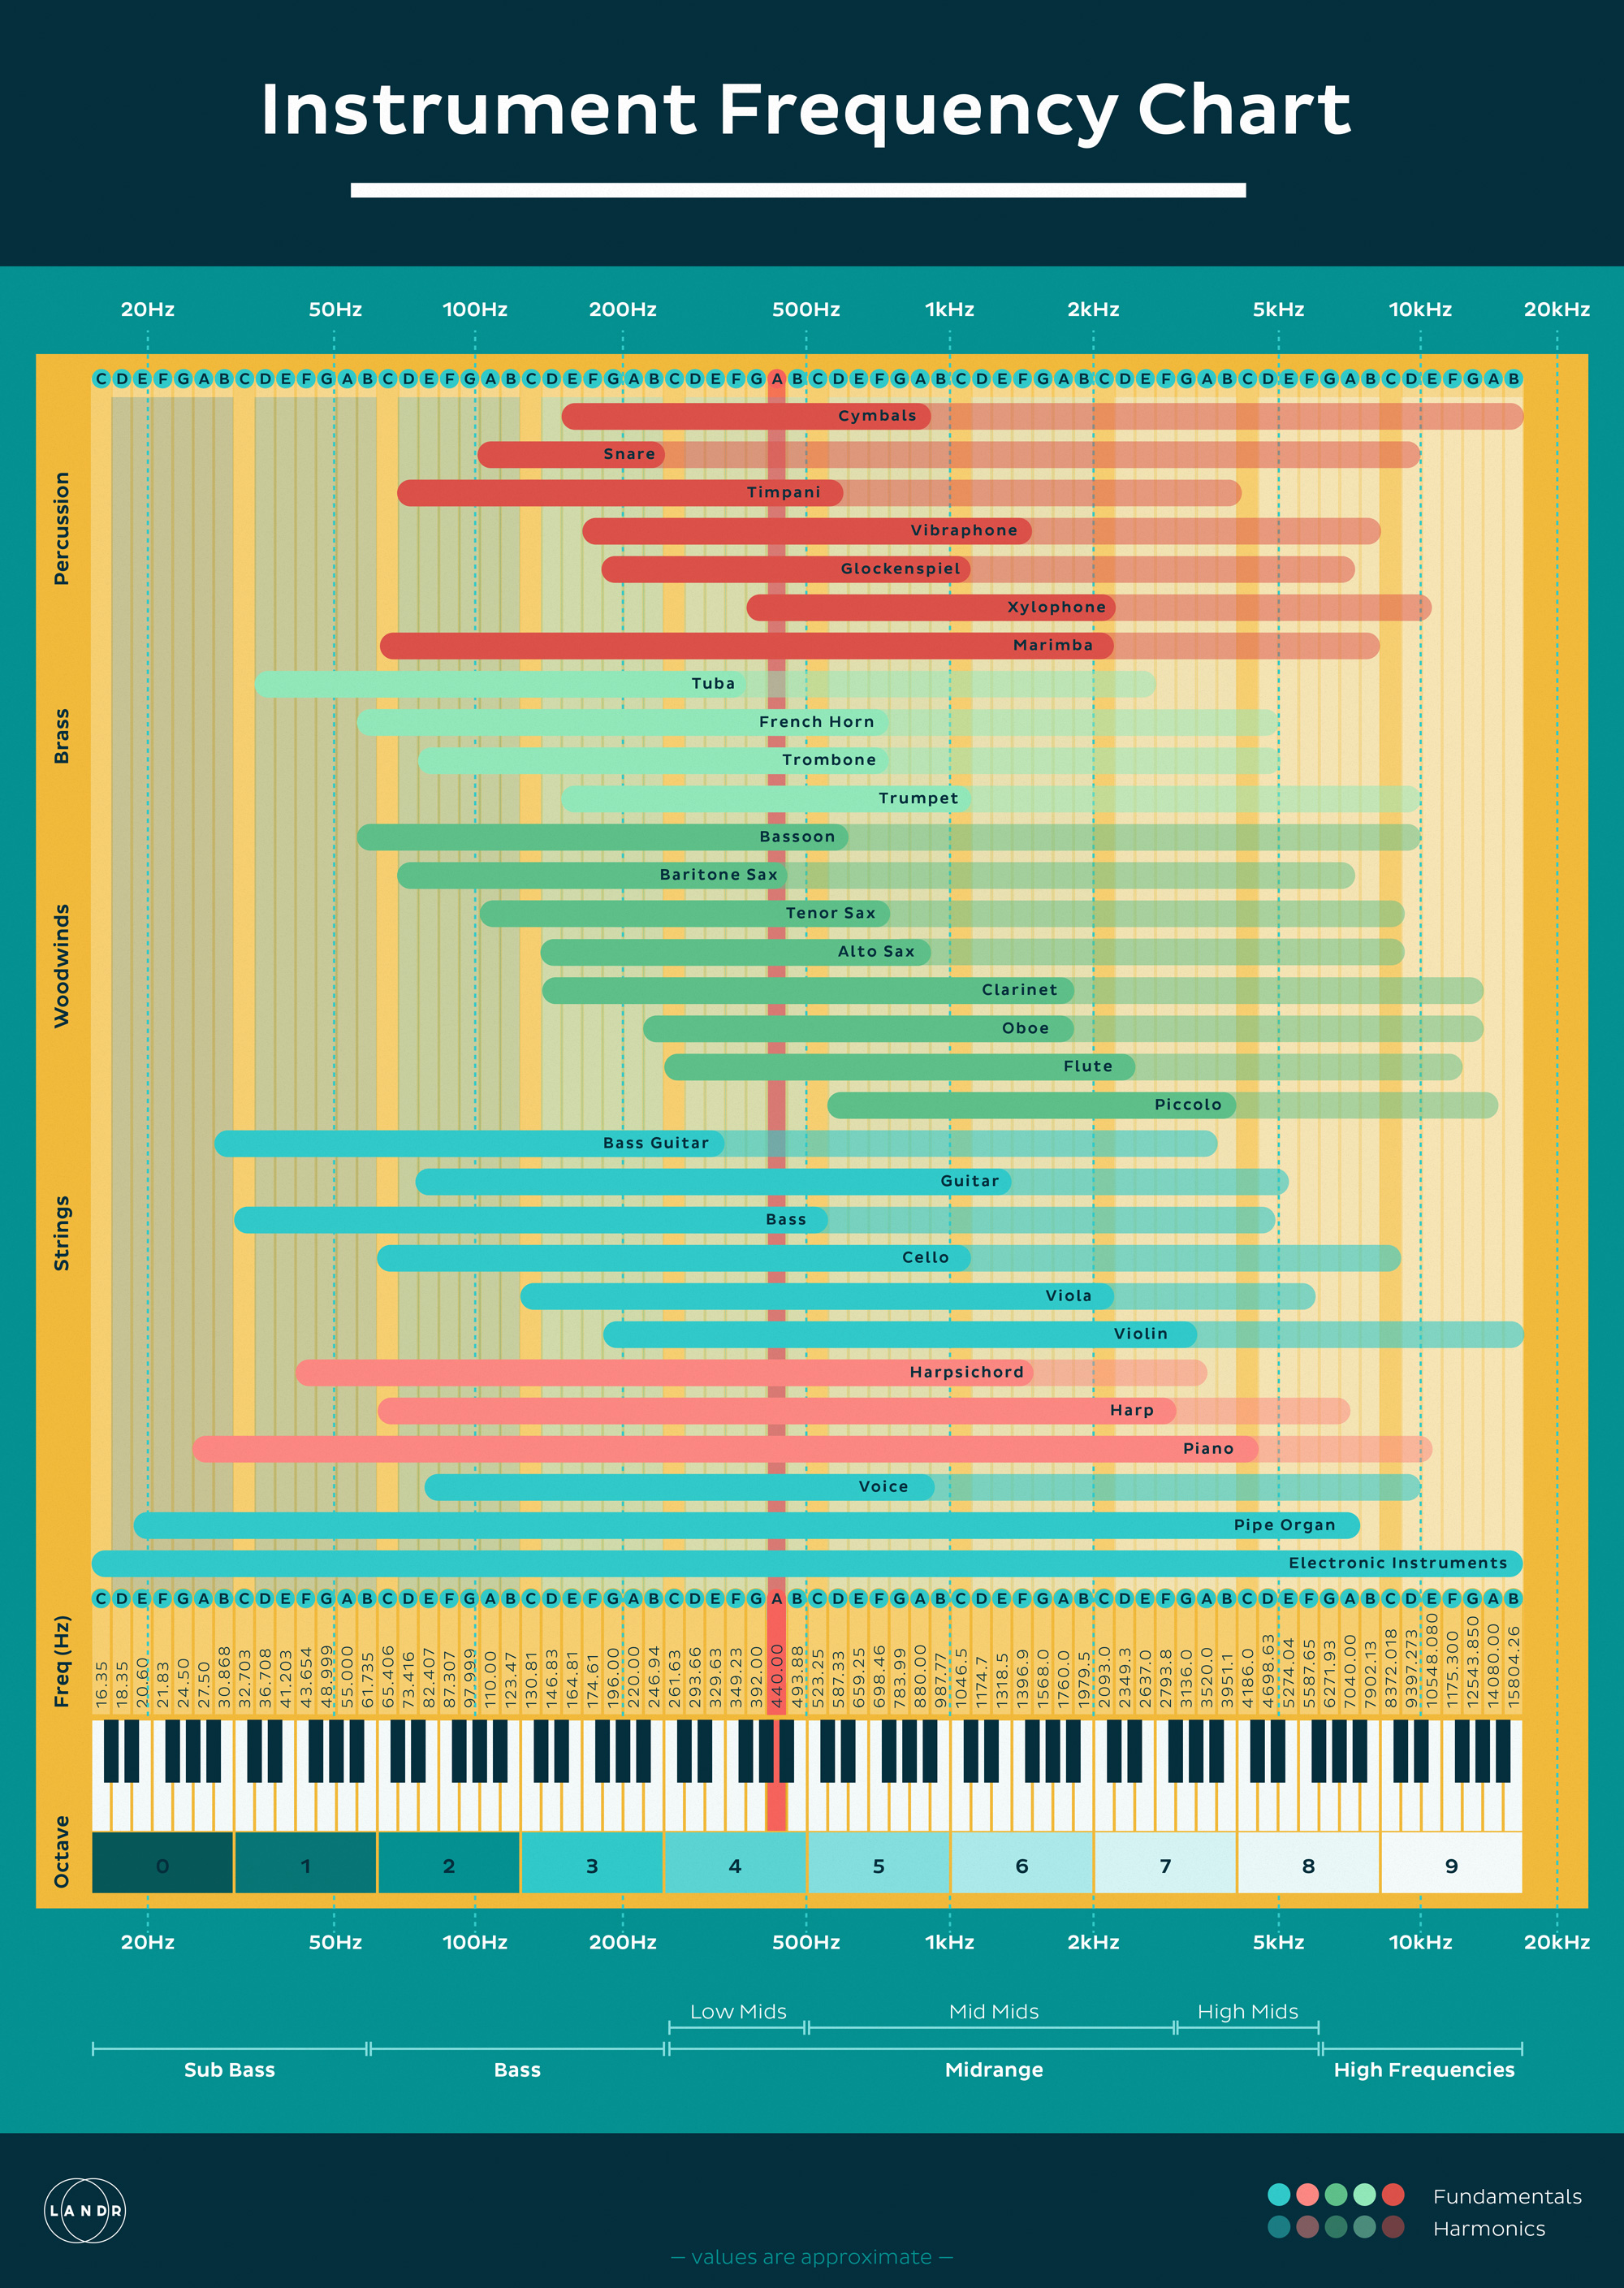
EQ Cheat Sheet
Meet your new best friend for fitting those fantastic frequencies!
Study it. Know it. Love it. Download it to your desktop for easy reference, or print it out and hang it on your studio wall.
Remember! This instrument chart is just a starting point. The sounds in your mix will always have their own context and characteristics. So use this chart as a jumping off point, but always use your mix as the ultimate reference for applying EQ.
This chart is not the ‘mixing law.’ Instead, it’s a good reference to get you started on thinking about where your performances sit in your mix—so use it accordingly.
How to Use A Frequency Chart
Using this instrument frequency chart is simple. Just think about the fundamentals of each instrument before you record anything.
Try to picture where each instrument will sit in the mix before you even start recording.
If you choose your instruments based on the frequency fundamentals before you even start, the mixing and EQing phase will be much easier.
Synthesizers and other electronic instruments can be tricky when it comes to finding the fundamental. They’re often capable of creating an extremely wide range of sounds and frequencies.
The simple fix is to hone in on what sound you’ll be trying to synthesize in your track with your gear.
Try to picture where each instrument will sit in the mix before you even start recording.
For example: If you’ll be using an FM synth to create a brass lead sound, then the fundamental for the brass instrument you’re attempting to synthesize should apply.
You’ll never really know until you hear it in your mix. But try and be as prepared as possible before recording anything.
There are no ‘exact’ rules for which frequency bands will cause problems for what instrument.
So always listen, look and learn from the context of your own mix after you’ve recorded your parts.
Of course you CAN use as many instruments as you want that fall into a certain frequency band. But the more instruments you stack, the easier it is to mask important information. So your EQing will have to be more complex to get everything sitting right.
Roll the Beats
Most parametric EQs come with high pass and low pass filters built right in. They’re a great place to start with some corrective EQing to free up some space in your mix.
Instruments that have a higher fundamental, will also contain information in the lower frequencies as well.
In most cases, the lower frequencies for an instrument with a higher fundamental—and vice versa—can be rolled off. That’s where the high and low pass filters come in…
Instead of performing specific cuts or boosts, the high and low pass filters will remove unneeded frequencies on a broader scale.
A common use of the high-pass filter is to remove lower frequencies on your sounds with a higher fundamental like a hi-hat or rim shot.
The lower frequencies that these sounds contain may be muddying up your lows. Performing a simple high pass will give your bassier sounds more room to punch while giving your synths and higher percussion more clarity at the top of your mix.
The opposite applies for your low pass filter as well. Removing unnecessary higher frequencies from your lows will give everything more room to work up top.
Keep in mind that all instruments contain important information in the high and low frequency bands. So only roll off what you absolutely need to. Always use your ear to determine the right amount.
Sweep Your Bands
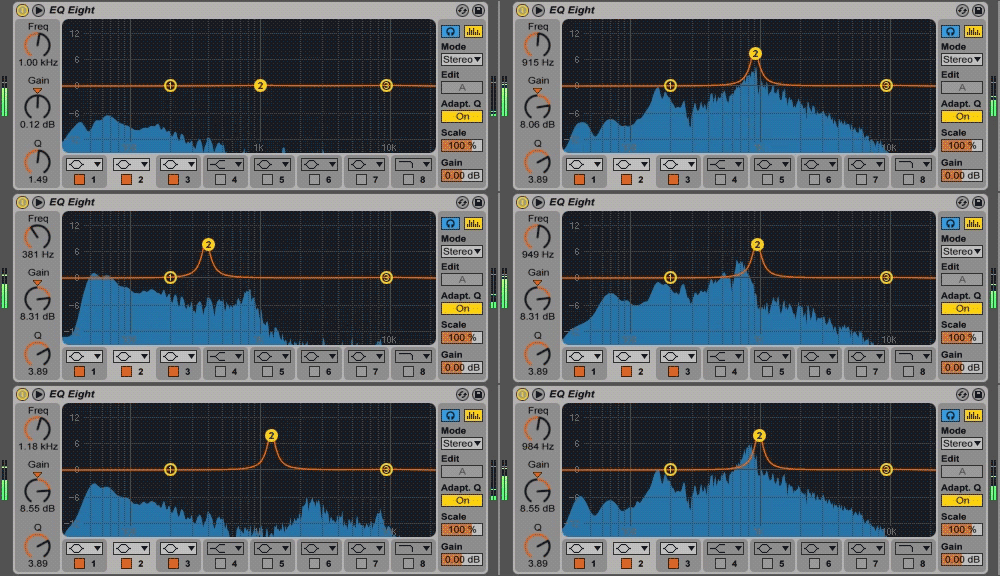
EQ sweeping is your best friend when it comes to finding the problem areas in your mix. EQ sweeps will help you pinpoint the exact frequency you’re looking to fix. So how do you do it?
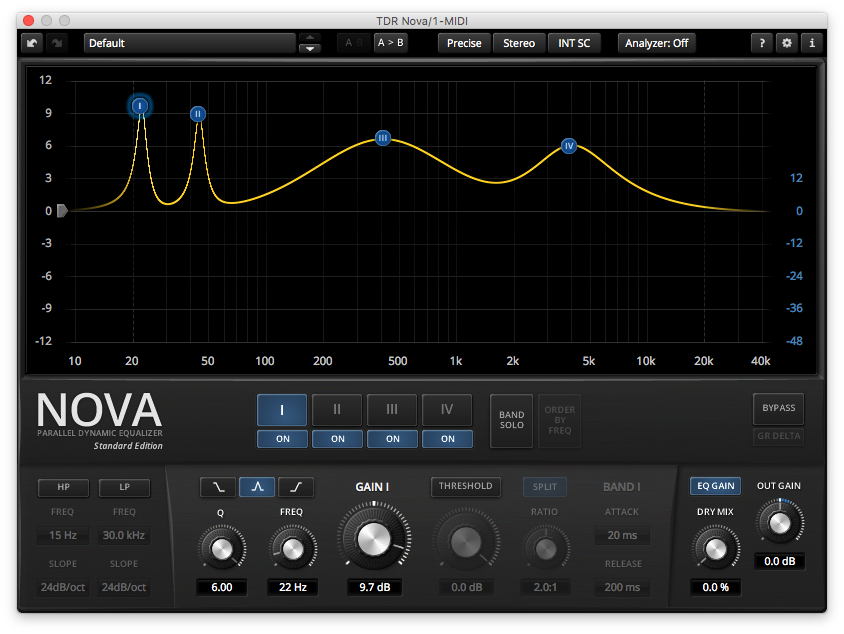
For starters, set a point with a high gain and narrow bandwidth (the ‘Q’) in your parametric EQ. Start playing back your track and ‘sweep’ the point back and forth across the frequency spectrum.
Listen for when the problem you are trying to fix gets REALLY OBVIOUS (your ears might even get a bit sad for a second). But once you hear it, you know you’ve found the frequency where you’ll be making your cut. For example:
If you’re looking to take out some boominess from a guitar tone, sweep your EQ until you find the frequency where the boom is most noticeable. When you find the culprit, simply perform your cut in the frequency you pinpointed and play it back (I’ll talk more about cuts in a second).
Sometimes certain problems can be fixed during the high and low pass filtering phase that I talked about above. But performing an EQ sweep will help you to isolate really specific areas that might need a cut or boost.
Hot Tip: Make sure you stay focused on the problem you’re trying to cut. Boosting the gain in any area will make parts sound less than ideal. Don’t cut everything that sounds bad automatically. Stick to pinpointing one specific fix at a time.
Keep it Narrow for Cuts
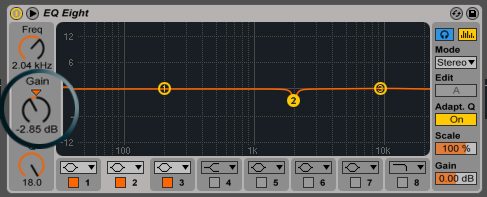
Now that you’ve isolated your problem frequency it’s time to apply some cuts to attenuate the nasty.
As a rule of thumb try to keep your cuts no more drastic than 3dB. Anything more can be a little heavy handed. But it’s always the taster’s choice.
Keep your bandwidth narrow for cuts. Remember that a cut is removing information from your audio, so the wider your bandwidth (Q), the more character you’re removing from a sound. That’s why finding your specific problem frequency is so important. It allows you to cut only what you need to.
Keep it Wide for Boosts
EQ boosts need a wider Q. Boosting with a narrow bandwidth can make frequencies stick out like a sore thumb in the mix. A wider bandwidth (Q) helps to make your boosts a bit more natural to the ear.
A wider bandwidth works because of the science behind how we hear —and you can’t bet against science right? The ear wants natural sounds. A wider Q helps to keep your boosts as organic as possible.
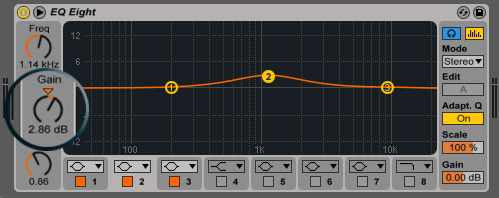
Boosting is where you can get really experimental with your EQing and pull some interesting character out of your sound. Experiment with boosts outside of the fundamental. Small boosts to your sound’s harmonics can have interesting results for creating punch, presence and intrigue in your mix.
🧠 Hot tip
Experimenting with EQing harmonics can add richness and character to your sound. But they’re also a great place to look if you’re encountering cluttered band. Try both for best results!
Pan-Freqs
Panning is a great way to free up some space for two instruments that share the same frequency range.
If you’re hesitant to mess with the tone too much with EQ but you’re still hearing some masking in the mix, try panning one sound to the left and one to the right.
Giving conflicting sounds their own space in the stereo field will bring out those unique frequency and timbral features and help individualize them in the mix.
It’s always the taster’s choice.
Using your pans to give your parts room means less frequency face-offs between your instruments. It’s not always a sure-shot fix. But panning is something you should be doing every mix anyways. So you might as well get the most out of it.
The high pass and low pass rules still apply for rolling off the unnecessary frequencies. But panning gives you options if you don’t wanna alter the character of your sound just to make 2 or more instruments fit.
Hear the Whole. Not the Solo.
The biggest trap when it comes to EQing is getting obsessed with your isolated sounds. ALWAYS listen to the whole mix and EQ accordingly. Your sounds are part of a whole and how you sculpt with EQ has to be dependent on their role within the entire project.
If you’re EQing just for the soloed sound you’re missing the whole point. That’s why it’s called “Mixing” and not “Soloing.”
When in doubt try and think like the listener. They’re not gonna hear the elements of your track soloed like you do in the studio. They’ll only hear the whole song. So let your overall sound inform all your EQing decisions.
Certain sounds might even sound ‘bad’ when they’re soloed. But when they go off in the whole mix they’ll sound peachy. It’s what good mixing is all about—especially when it comes to EQing.
Be EQool
A good recording is the first step to a good mix. But the in between step that can make a good mix great is smart EQing.
Use these basic tips to get started with your EQ experiments and find out what it can do for your tracks.
And always keep it Freq-y!
Gear guides, tips, tutorials, inspiration and more—delivered weekly.
Keep up with the LANDR Blog.
